Azure Active Directory B2C Configuration
The following demo app and configuration uses Azure AD 2.0 B2C. For Enterprise customers who need details on how to configure Auth Connect with Azure AD 1.0, please contact us.
Demo App
-
Simple: A login/logout experience that works on the web, iOS, and Android. See it in action in this short video. To view the Azure AD configuration details, see
authentication.service.tshere. -
Advanced: Demonstrates the use of Auth Connect to perform an OAuth login and Identity Vault to store the resulting authentication tokens on the web, iOS, and Android. To view the Azure AD configuration details, see
authentication.service.tshere.
Configuration Details
Azure Configuration
Before integrating Auth Connect into your Ionic app, you’ll need to get Azure Active Directory (AD) up and running.
For complete information on configuring Azure AD, consult the official B2C documentation which includes tutorials on creating a B2C tenant, registering applications, and more.
Create an Azure AD B2C Tenant
If you don't have one, create a new B2C tenant.
Register an Application
Sign into the Azure Portal then navigate to the Azure AD B2C service page (the easiest way to find it is to search for "b2c", then choose "Azure AD B2C".)
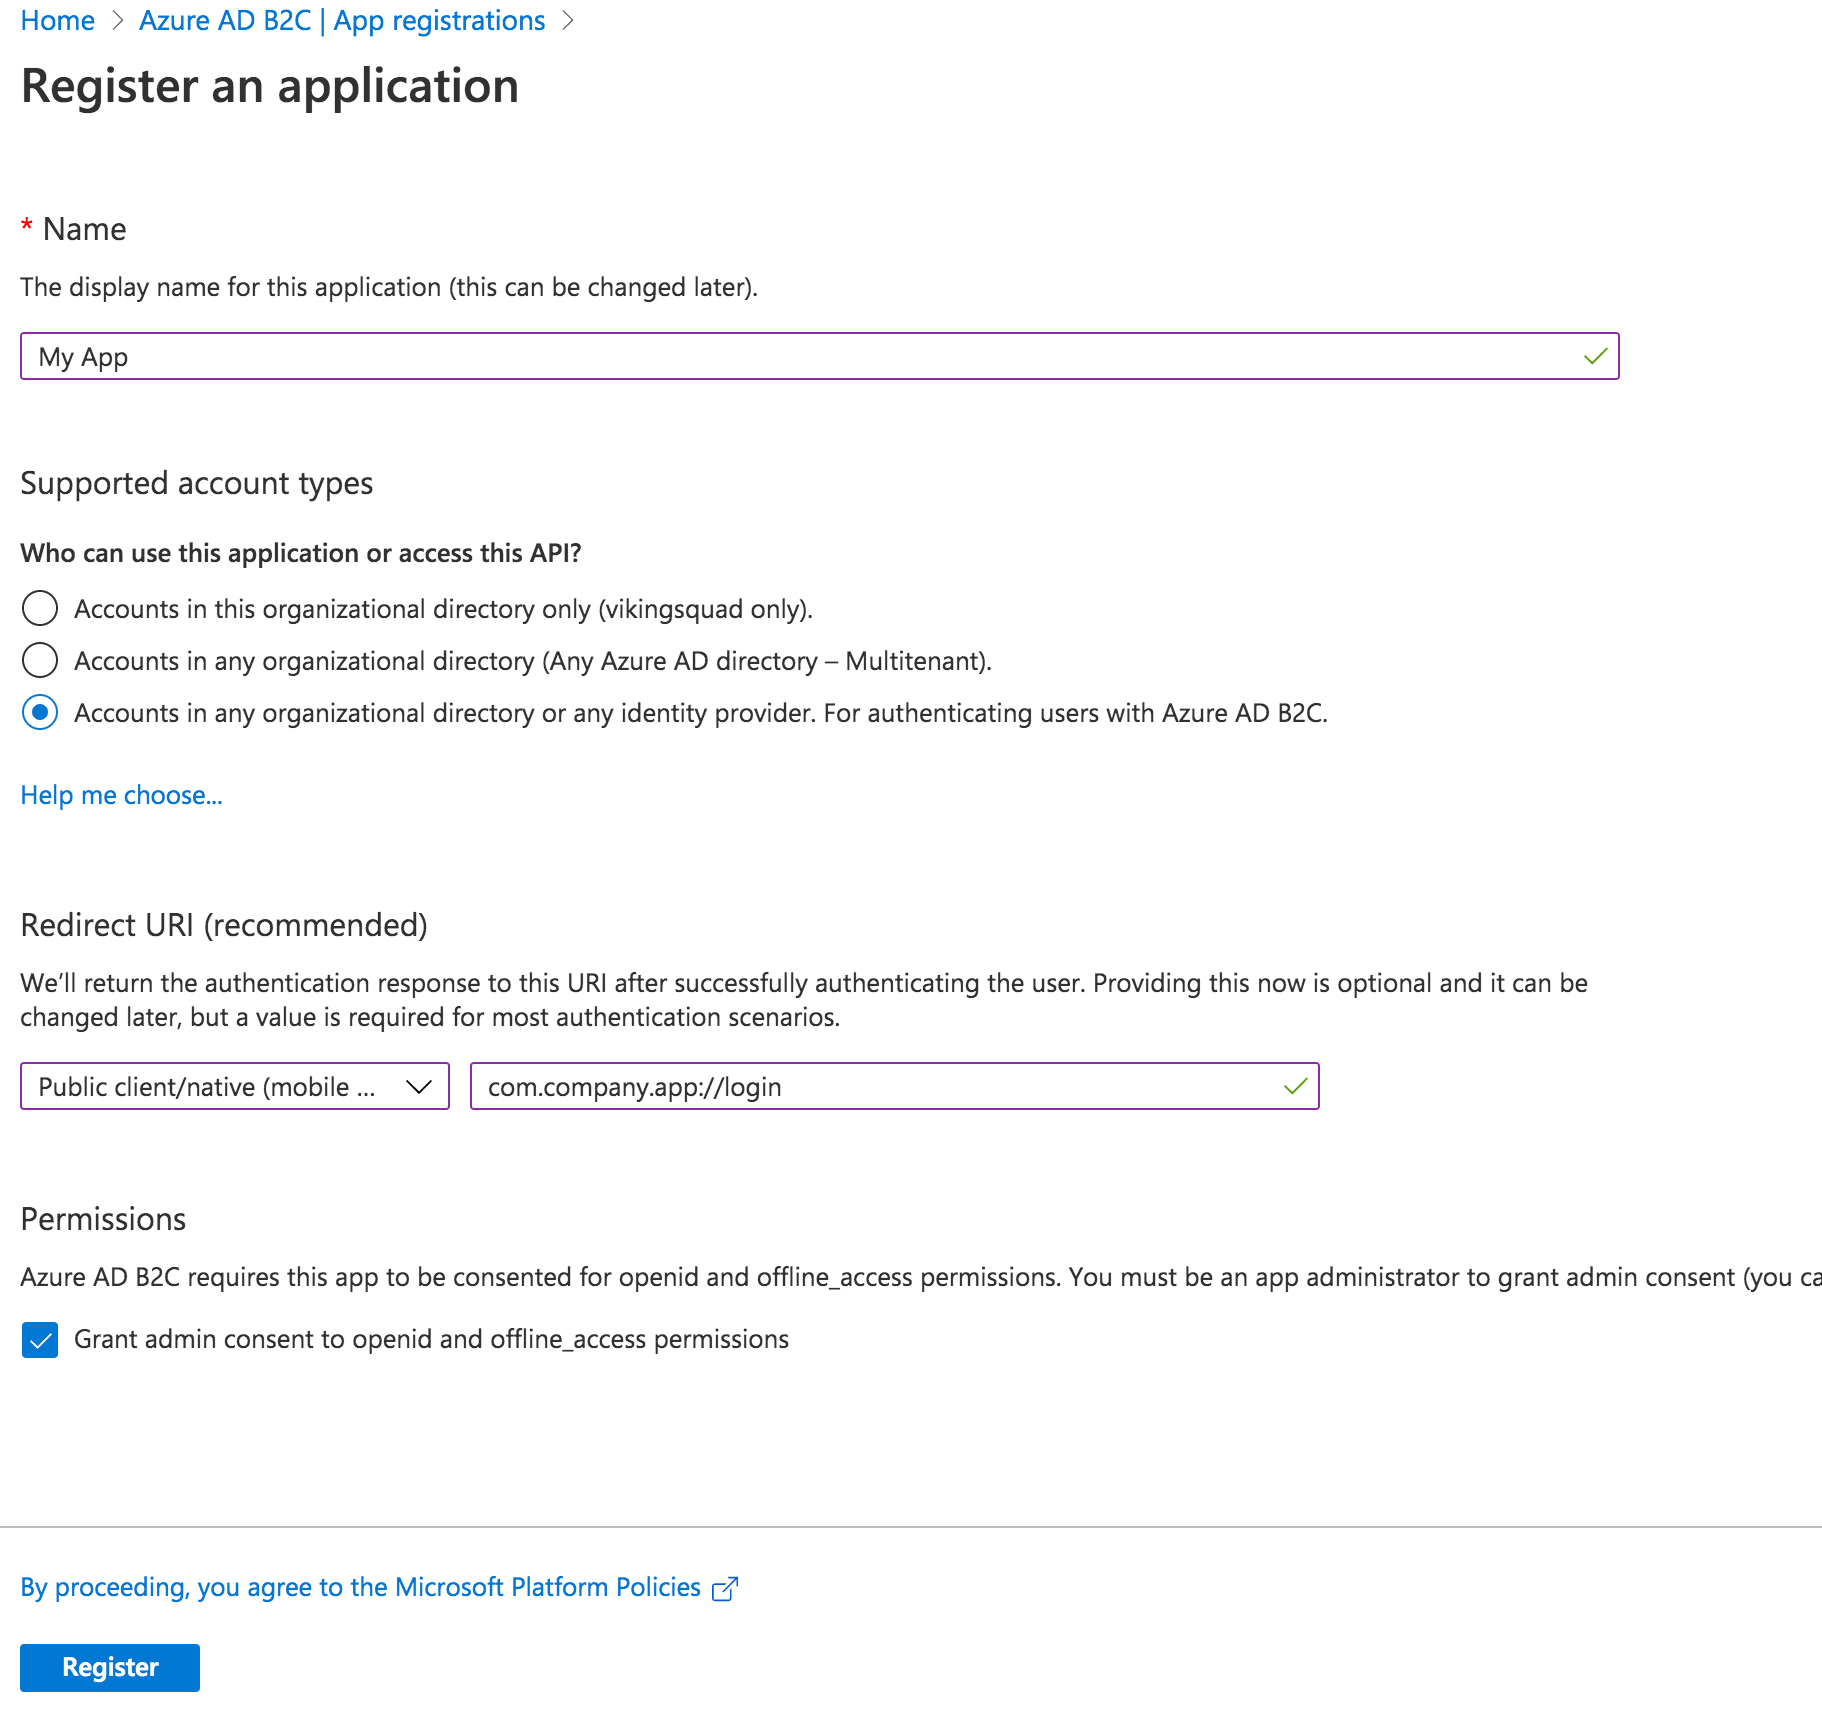
Begin by creating a new Application under Manage -> App registrations -> New registration.

Give your app a new name, then select the Supported Account Types.
With that in hand, set the Redirect URI. Choose “Public client/native (mobile & desktop)” - we’ll add web support in a separate step. Then, fill in the text field value with your globally unique App Id, which is used both in the Azure configuration as well as the native mobile app’s configuration. Typically, this takes the form of company-AppName or reverse DNS style - com.company.app. Use the formula “uniqueId://page”.
After the app user signs into Azure AD, this tells Auth Connect which page to redirect to in your app. While any page can be used, in this example we’ll use the Login page, such as com.company.app://login. Click the register button to create the app.
Add Web Platform
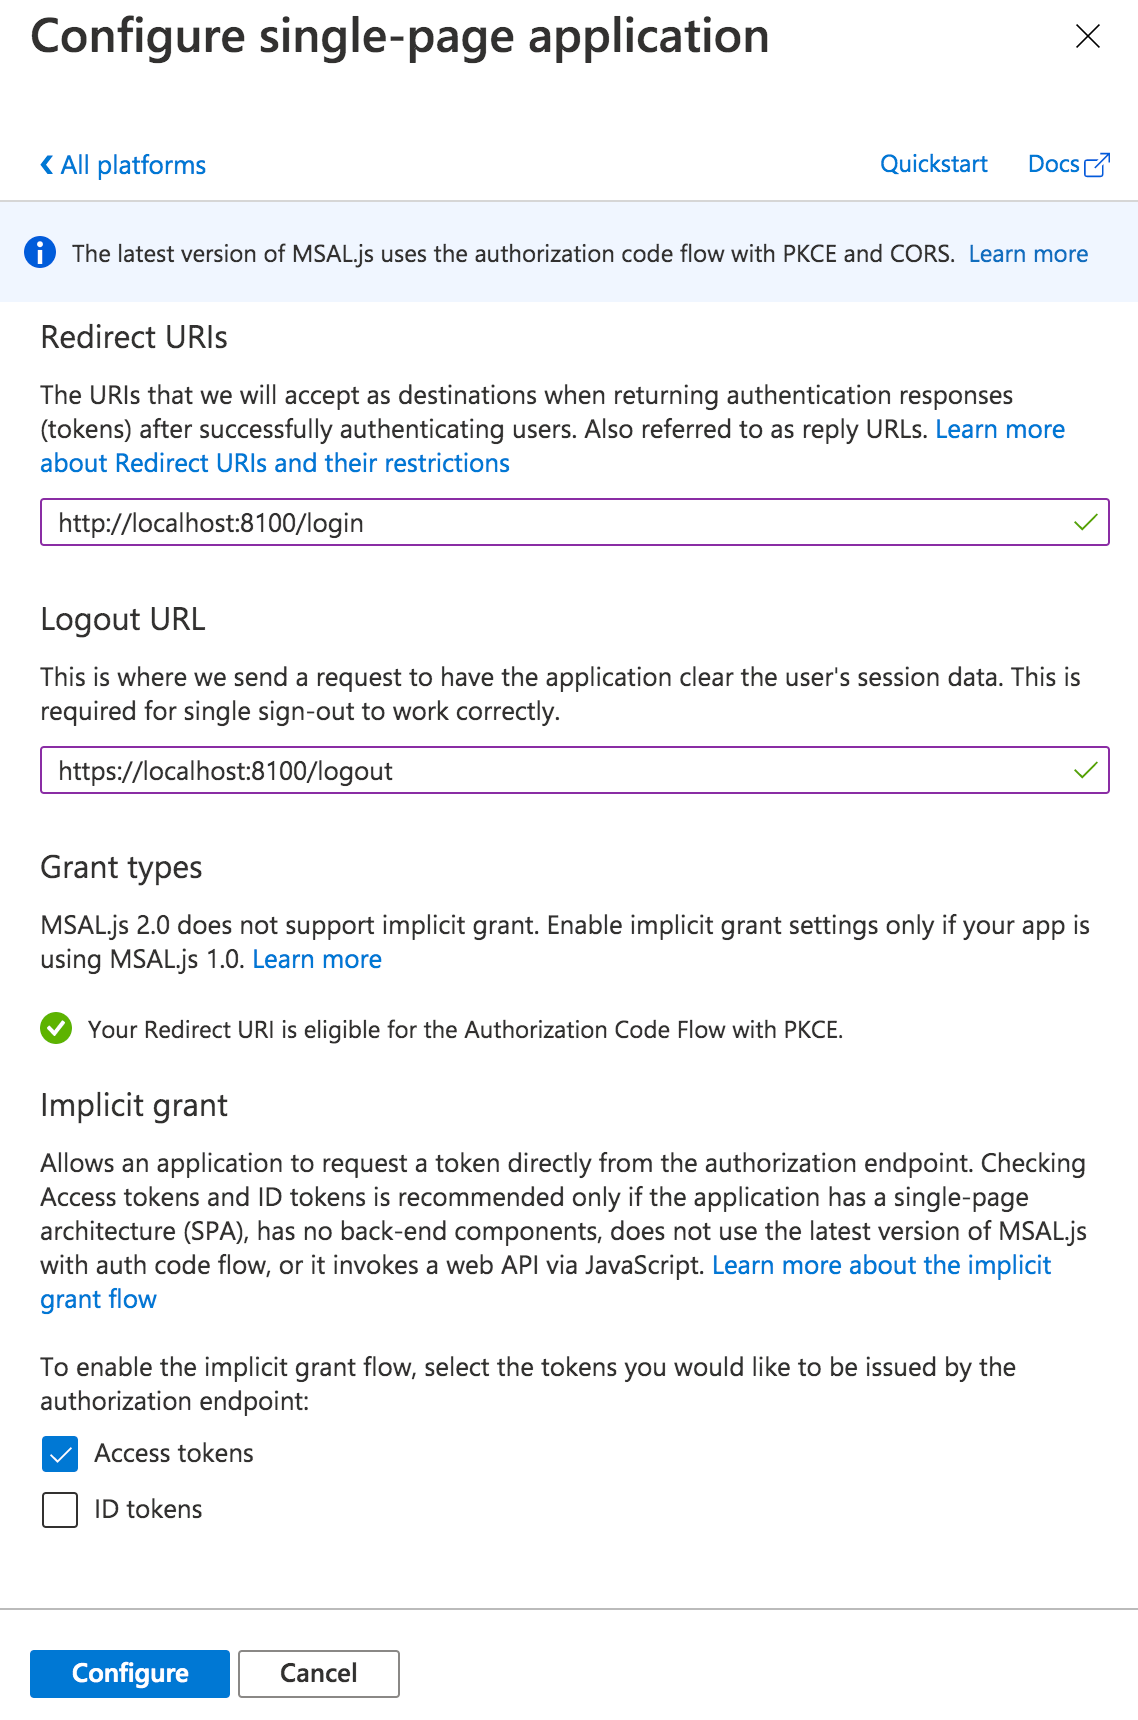
With the app created, navigate to Manage -> Authentication. Click the “Add a Platform” button. Under Web applications, choose “single-page application.”
Under Redirect URIs, specify a web URL. In this example, for local testing, we’ll use http://localhost:8100/ along with the name of your app's core login page (typically, login).
Next, under Logout URL, specify a web URL to redirect to once the user has logged out of your app. Again, for local testing, specify https://localhost:8100/ along with the name of the logout page (typically logout).
Finally, under Implicit Grant, toggle “Access tokens.” Click the Configure button to save.

Back on the Authentication page, look under the Single-page application settings. Click the “Add URI” button to add additional Redirect URIs, including those for other environments like staging or production. Click Save when ready.

Expose an API
Navigate to the “Expose an API” page. Click “Add a scope”, then for the Scope name, provide a value such as “user_impersonation.” For the display name and description fields, add details describing that this is for authenticating your users. Set the state to enabled then click the “Add scope” button.
Configure API Permissions
Next, we need to authorize our app so it can connect to Azure B2C and retrieve user profile information alongside login credentials. Navigate to the API Permissions page then click the “Add a permission” button. Under “Select an API”, choose “My APIs” then click the name of the B2C app we’re currently configuring. Next, select the “user_impersonation” permission (or whatever name you labeled it in the previous step) then click the “Add permissions” button.
Save the application, then click on the newly added permission row. Click the “Grant admin consent for [your organization name]” button then choose “Yes.”
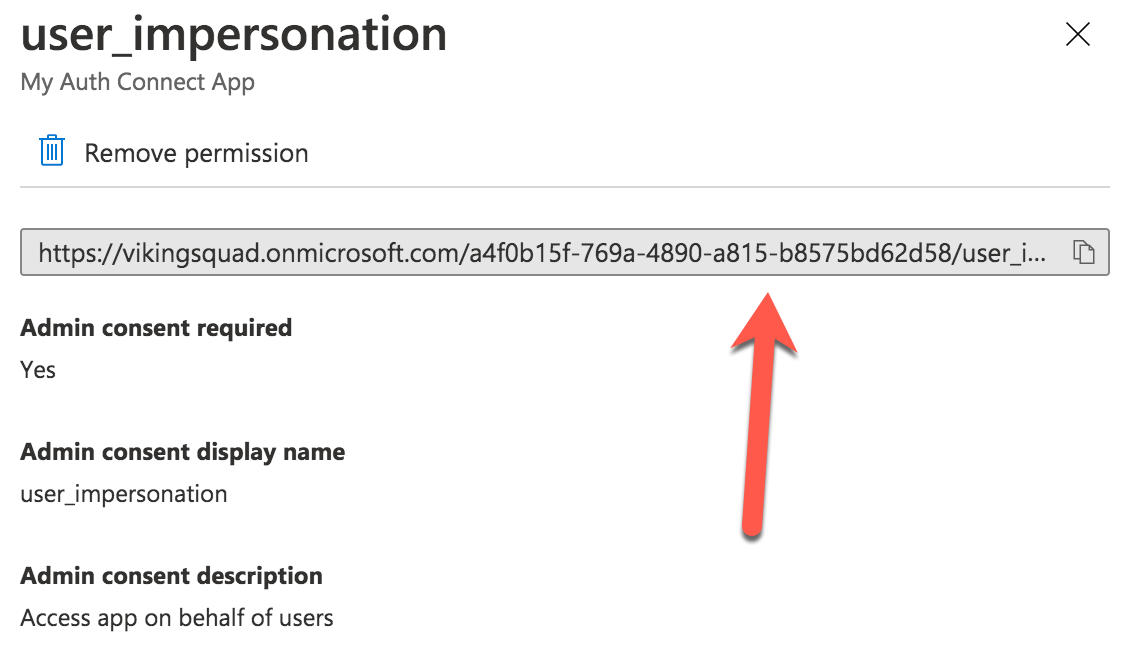
Click on the “user_impersonation” permission row again to open the modal window, then click to copy the link that is displayed. Note this URL, because it will be used as part of Auth Connect’s “scopes” property later.

Create User Flows (Policies)
Create at least one User Flow, the series of pages that define the entire authentication experience for your app. At a minimum, create a Sign up and sign in flow. Once the User Flow has been created, select it from the User Flow list, then click "Run user flow" from the Overview tab. Note the URL at the top of the page, used to configure Auth Connect's Discovery URL property. Also consider creating a Password reset flow (detailed below).
Azure AD B2C is now ready to use with Auth Connect.
Install Auth Connect
Run the following command to install the Auth Connect plugin. For the AUTH_URL_SCHEME variable, use the globally unique App Id (ex: com.company.app) you decided on when configuring the Azure AD app above.
Installation
If you have not already setup Ionic Enterprise in your app, follow the one-time setup steps.
Next, install the plugin:
- Capacitor
- Cordova
npm install @ionic-enterprise/auth
npx cap sync
ionic cordova plugin add capacitor-compat-plugin
ionic cordova plugin add @ionic-enterprise/auth --variable AUTH_URL_SCHEME=com.company.app
Configure Auth Connect
It's recommended to create an AuthenticationService class that encapsulates Azure AD and Ionic Auth Connect’s login functionality.
Generate this class using the ionic generate command:
_10ionic generate service services/authentication
Extend the IonicAuth class, then configure all Azure AD details in the IonicAuthOptions object:
_33import { IonicAuth, IonicAuthOptions } from '@ionic-enterprise/auth';_33_33export class AuthenticationService extends IonicAuth {_33_33constructor() {_33 const azureConfig: IonicAuthOptions = {_33 // The auth provider._33 authConfig: 'azure',_33 // The platform which the app is running on_33 platform: 'capacitor',_33 // client or application id for provider_33 clientID: 'FILL_IN',_33 // the discovery url for the provider_33 // OpenID configuration_33 discoveryUrl: 'FILL_IN',_33 // the URI to redirect to after log in_33 redirectUri: 'FILL_IN',_33 // requested scopes from provider_33 scope: 'FILL_IN',_33 // the URL to redirect to after log out_33 logoutUrl: 'FILL_IN',_33 // The type of iOS webview to use. 'shared' will use a webview that can_33 // share session/cookies on iOS to provide SSO across multiple apps but_33 // will cause a prompt for the user which asks them to confirm they want_33 // to share site data with the app. 'private' uses a webview which will_33 // not prompt the user but will not be able to share session/cookie data_33 // either for true SSO across multiple apps._33 iosWebView: 'private'_33 };_33 _33 super(azureConfig);_33 }_33}
Some of these IonicAuthOptions values are unique, and must be set based on your Azure AD app’s details:
platform: Use “cordova” or “capacitor” accordingly.clientID: Your app’s Application (client) ID. Example: cebbb0be-d578-4bbd-9712-4b0fe05c06aaredirectUri: The URI to redirect to after the user has logged in. Use the same AUTH_URL_SCHEME variable value (App Id) from when the Auth Connect plugin was installed. Example: com.company.app://callbacklogoutUrl: The URI to redirect to after the user has logged out. Example: com.company.app://logoutscope: Unlock access to protected resources, such as read/write permissions. Example: openid offline_access email picture profile
The scope property is used to unlock access to protected resources, such as read/write permissions. There’s a variety of attributes available; an example looks like: “openid offline_access email profile”.
In addition to the values above, add the Full Scope Value link created earlier to the scope property. To find it in the Azure AD B2C portal, navigate to the “Expose an API” page then click on the Scope you defined earlier. In the modal window, copy the link that appears under “Scope name.” All together, it will look similar to this:
_10scope: 'openid offline_access email profile https://orgname.onmicrosoft.com/api/user_impersonation',
The discoveryUrl can be found by navigating to the main Azure AD B2C page -> Policies -> User Flows -> [Select User Flow] -> Overview tab -> Run user flow button. The discovery link is at the top page and will look like the following format:
https://B2C-TENANT-NAME.b2clogin.com/B2C-TENANT-NAME.onmicrosoft.com/v2.0/.well-known/openid-configuration?p=POLICY-NAME
Where B2C-TENANT-NAME is your tenant name and the POLICY-NAME is the name of the User Flow created earlier.
What's Next?
Check out the full list of configuration options available, then implement the other steps in the Auth Connect workflow.
Implementing Password Reset
To implement password reset functionality, a custom User Flow needs to be created. Navigate to the User flows (policies) page, then click the "New user flow" button. Next, select the "Password reset" user flow type. As part of the Application claims section, choose "Email Addresses" at a minimum. After the user flow has been created, select it from the User Flow list, then click "Run user flow" from the Overview tab. Note the URL at the top of the page - use it as the discovery url for password reset.
Within your app, implement the following logic:
If an error is thrown after the Login function is called, inspect the message property. If it starts with the string AADB2C90118 (part of the error message returned by Azure AD),
then call Login again, this time specifying the location of the password reset endpoint.
_15// Snippet example: Password reset_15async login() {_15 try {_15 await super.login();_15 }_15 catch (error) {_15 // Handle password reset (only applicable for Azure AD B2C)_15 const message: string = error.message;_15 if (message && message.startsWith('AADB2C90118')) {_15 await super.login("DISCOVERY_URL_FOR_PASSWORD_RESET");_15 } else {_15 throw new Error(error.error);_15 }_15 }_15}