Authentication Guide
To support authentication workflows in your Capacitor Windows app, such as when using Ionic Auth Connect, there are a few changes that need to be made to your project.
First, the app must support single instancing so authentication redirects back to the app do not open multiple windows. Then, some additional code must be added to pass the authentication callback data to the web view to be processed.
Packaged Apps using Windows App SDK:#
First, we will need to add a custom Main method to the app, which requires disabling the automatic Main that Visual Studio generates in our app.
Open your App.csproj in an editor and add the <PropertyGroup> entries for DISABLE_XAML_GENERATED_MAIN as shown in the example below:
<Project Sdk="Microsoft.NET.Sdk">    <PropertyGroup>        <OutputType>WinExe</OutputType>        <TargetFramework>net5.0-windows10.0.19041.0</TargetFramework>        <TargetPlatformMinVersion>10.0.17763.0</TargetPlatformMinVersion>        <RootNamespace>App</RootNamespace>        <ApplicationManifest>app.manifest</ApplicationManifest>        <Platforms>x86;x64;arm64</Platforms>        <RuntimeIdentifiers>win10-x86;win10-x64;win10-arm64</RuntimeIdentifiers>        <UseWinUI>true</UseWinUI>    </PropertyGroup>
    <!-- START: ADD THESE -->    <PropertyGroup Condition="'$(Configuration)|$(Platform)'=='Debug|x86'">        <DefineConstants>DISABLE_XAML_GENERATED_MAIN</DefineConstants>    </PropertyGroup>    <PropertyGroup Condition="'$(Configuration)|$(Platform)'=='Release|x86'">        <DefineConstants>DISABLE_XAML_GENERATED_MAIN</DefineConstants>    </PropertyGroup>    <PropertyGroup Condition="'$(Configuration)|$(Platform)'=='Debug|x64'">        <DefineConstants>DISABLE_XAML_GENERATED_MAIN</DefineConstants>    </PropertyGroup>    <PropertyGroup Condition="'$(Configuration)|$(Platform)'=='Release|x64'">        <DefineConstants>DISABLE_XAML_GENERATED_MAIN</DefineConstants>    </PropertyGroup>    <PropertyGroup Condition="'$(Configuration)|$(Platform)'=='Debug|arm64'">        <DefineConstants>DISABLE_XAML_GENERATED_MAIN</DefineConstants>    </PropertyGroup>    <PropertyGroup Condition="'$(Configuration)|$(Platform)'=='Release|arm64'">        <DefineConstants>DISABLE_XAML_GENERATED_MAIN</DefineConstants>    </PropertyGroup>    <!-- END -->
<ItemGroup> <PackageReference Include="Microsoft.WindowsAppSDK" Version="1.0.2" /> <PackageReference Include="Newtonsoft.Json" Version="13.0.1" /> <PackageReference Include="Capacitor" Version="1.*" /> <Manifest Include="$(ApplicationManifest)" /> </ItemGroup></Project>Next, create a new .cs file named Program.cs inside of the App project, with the following contents. This will be the new Main entry point for the app and will manage app instancing and sending through Protocol events that will happen when our app is opened from an authentication redirect:
using Microsoft.UI.Dispatching;using Microsoft.Windows.AppLifecycle;using System;using System.Threading;using System.Threading.Tasks;using Windows.ApplicationModel.Activation;
namespace App {    // NOTE: We need to check for redirection as early as possible, and    // before creating any windows. To do this, we must define this symbol    // in the project build properties:    // DISABLE_XAML_GENERATED_MAIN    // ...and define a custom Program class with a Main method
    public static class Program {        private static string INSTANCE_KEY = "myApp";
        // Replaces the standard App.g.i.cs.        // Note: We can't declare Main to be async because in a WinUI app        // this prevents Narrator from reading XAML elements.        [STAThread]        static void Main(string[] args) {            WinRT.ComWrappersSupport.InitializeComWrappers();
            bool isRedirect = DecideRedirection();            if (!isRedirect) {                Microsoft.UI.Xaml.Application.Start((p) => {                    var context = new DispatcherQueueSynchronizationContext(                        DispatcherQueue.GetForCurrentThread());                    SynchronizationContext.SetSynchronizationContext(context);                    new App();                });            }        }
        #region Report helpers
        private static void OnActivated(object sender, AppActivationArguments args) {            ExtendedActivationKind kind = args.Kind;            if (kind == ExtendedActivationKind.Protocol) {                if (args.Data is IProtocolActivatedEventArgs protoArgs) {                    if (App.Current is App thisApp && thisApp.AppWindow != null &&                        thisApp.AppWindow is MainWindow thisWindow) {                        thisWindow.HandleRedirect(protoArgs.Uri);                    }
                }            }        }
        #endregion

        #region Redirection
        // Decide if we want to redirect the incoming activation to another instance.        private static bool DecideRedirection() {            bool isRedirect = false;
            // Find out what kind of activation this is.            AppActivationArguments args = AppInstance.GetCurrent().GetActivatedEventArgs();            ExtendedActivationKind kind = args.Kind;            if (kind == ExtendedActivationKind.Launch) {                // This is a launch activation.                AppInstance keyInstance = AppInstance.FindOrRegisterForKey(INSTANCE_KEY);
                // If we successfully registered the file name, we must be the                // only instance running that was activated for this file.                if (keyInstance.IsCurrent) {                    // Hook up the Activated event, to allow for this instance of the app                    // getting reactivated as a result of multi-instance redirection.                    keyInstance.Activated += OnActivated;                }            } else if (kind == ExtendedActivationKind.Protocol) {
                try {                    // This is a file activation: here we'll get the file information,                    // and register the file name as our instance key.                    if (args.Data is IProtocolActivatedEventArgs protoArgs) {                        var uri = protoArgs.Uri;                        AppInstance keyInstance = AppInstance.FindOrRegisterForKey(INSTANCE_KEY);
                        // If we successfully registered the file name, we must be the                        // only instance running that was activated for this file.                        if (keyInstance.IsCurrent) {                            // Report successful file name key registration.
                            // Hook up the Activated event, to allow for this instance of the app                            // getting reactivated as a result of multi-instance redirection.                            keyInstance.Activated += OnActivated;                        } else {                            isRedirect = true;                            RedirectActivationTo(args, keyInstance);                        }                    }                } catch (Exception ex) {                    throw;                }            }
            return isRedirect;        }
        private static IntPtr redirectEventHandle = IntPtr.Zero;
        // Do the redirection on another thread, and use a non-blocking        // wait method to wait for the redirection to complete.        public static void RedirectActivationTo(            AppActivationArguments args, AppInstance keyInstance) {            var redirectSemaphore = new Semaphore(0, 1);            Task.Run(() => {                keyInstance.RedirectActivationToAsync(args).AsTask().Wait();                redirectSemaphore.Release();            });            redirectSemaphore.WaitOne();        }
        #endregion
}}Add the following code to App.xaml.cs right inside of the App class to expose our app's Window instance:
namespace App {    /// <summary>    /// Provides application-specific behavior to supplement the default Application class.    /// </summary>    public partial class App : Application {
// ADD THIS: public Window AppWindow { get { return m_window; } private set { } }Passing Auth Data#
To make sure any Protocol events that opened our app end up passing the correct authentication URL redirect back to the web view, add this method inside of the MainWindow class in your MainWindow.xaml.cs file. Note: this code is for Ionic Auth Connect and may need to be modified depending on your authentication library JS API:
using System.Web;
namespace App {    /// <summary>    /// An empty window that can be used on its own or navigated to within a Frame.    /// </summary>    public sealed partial class MainWindow : Window {        /* ... */
        // ADD THIS:        public async void HandleRedirect(Uri uri) {            var js = $@"async function handleACCallback() {{    var u = new URL('{HttpUtility.JavaScriptStringEncode(uri.ToString())}');    if (u.searchParams.get('code')) {{        await window.IonicAuth.handleLoginCallback('{HttpUtility.JavaScriptStringEncode(uri.ToString())}');    }} else {{        await window.IonicAuth.handleLogoutCallback();    }}    if (window.IonicAuth.implementation.lastAuthPopup) {{        window.IonicAuth.implementation.lastAuthPopup.close();    }}}}handleACCallback();            ";
this.CapacitorWebView.DispatcherQueue.TryEnqueue(() => { _ = this.CapacitorWebView.ExecuteScriptAsync(js); }); }Register Protocol Handler#
Finally, our app must register to handle certain custom URL protocols in order to launch and handle auth redirects. Open Package.appxmanifest in the App (Package) project, then navigate to the Declarations tab. Select Protocol in the Available Declarations dropdown, then choose a Logo, Display name, and Name for the protocol. The Name field is the most important: this is the protocol or custom URL scheme you will use to redirect back to the app. For example, we chose ionic.cs.appsummit for our demo app because the redirect url will be of the form ionic.cs.appsummit:// which will trigger our app to load and handle the auth redirect.
Expose Ionic Auth#
If using Auth Connect, the main IonicAuth subclass must be assigned on window for the native side to access it.
In your main authentication service, add this code in the constructor or immediately after initializing your authentication service:
(window as any).IonicAuth = this;Use Custom Protocol for Redirect#
Make sure to change the Redirect URL in your authentication service (on the backend) to use the custom protocol handler. For example, we use ionic.cs.appsummit://login in the settings for our cloud-based authentication service when redirecting back to the native windows app.
Unpackaged Apps#
Setting up an authentication flow along with single-instancing the app and handling URL launches is similar to the packaged workflow, but requires some extra work in the Setup project to ensure the correct registry entries are set to handle your URLs.
Setup registry in Installer#
The Setup project needs to set specific registry keys in order for Windows to know it wants to handle custom URL protocols. There is a very specific way this needs to be done.
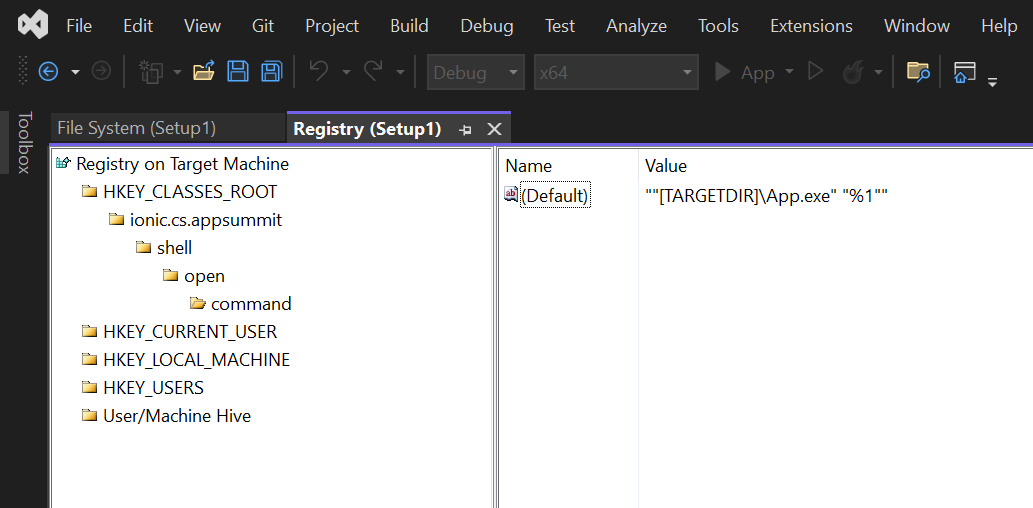
First, in the solution explorer, right click on the Setup project and choose View -> Registry:
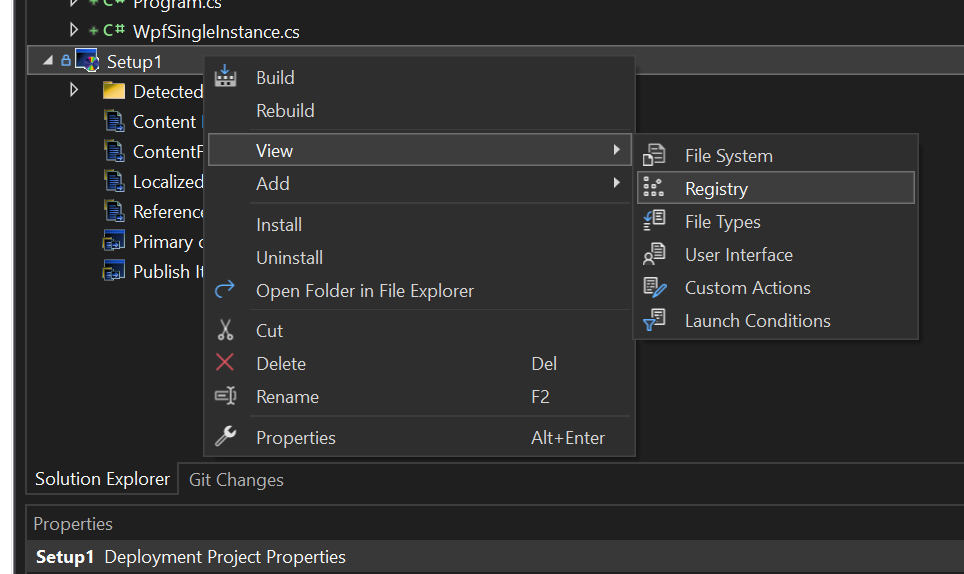
This will open the registry editor to view the registry entries the Setup project will create on install.
The first key we need to create is one that exactly matches our custom URL protocol. To do this, right click on HKEY_CLASSES_ROOT and choose New Key. Then, give that key the name of your custom URL protocol. For example, our app needs to respond to URLs of the form ionic.cs.appsummit:// so we named our key ionic.cs.appsummit:
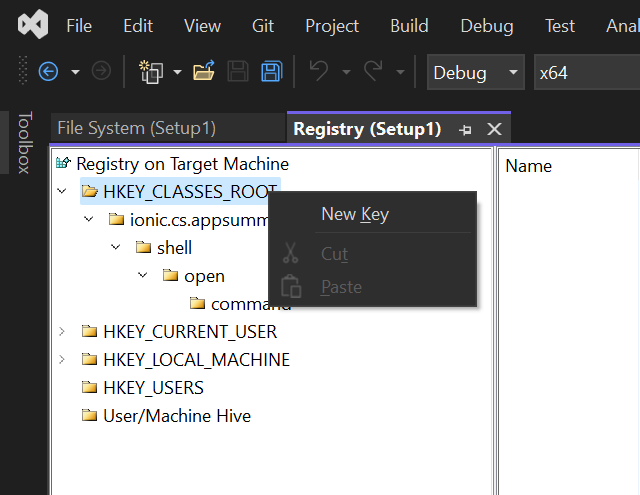
Then, go and add a key below this new one with the value shell. Add open to shell, and command to open. Your registry key tree should look like the screenshot above.
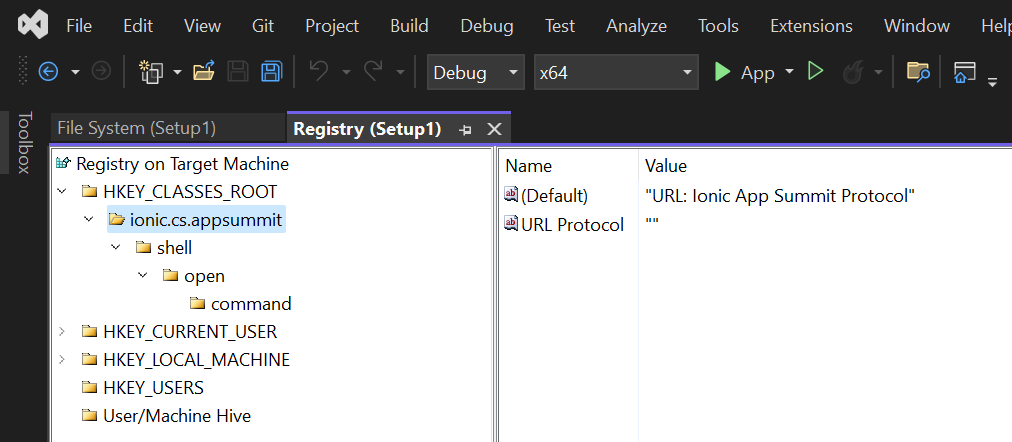
Finally, we need to add registry values inside of two of these keys. The first is the top-level URL protocol key, and we need to add the following values:
To add a new value, right click in the right-side pane and choose New -> String Value:

The first key that we need to add is a value for the (Default) registry value. In order to create this, the (Name) for this value in the properties editor should be blank. Do not name it (Default) or it will break!
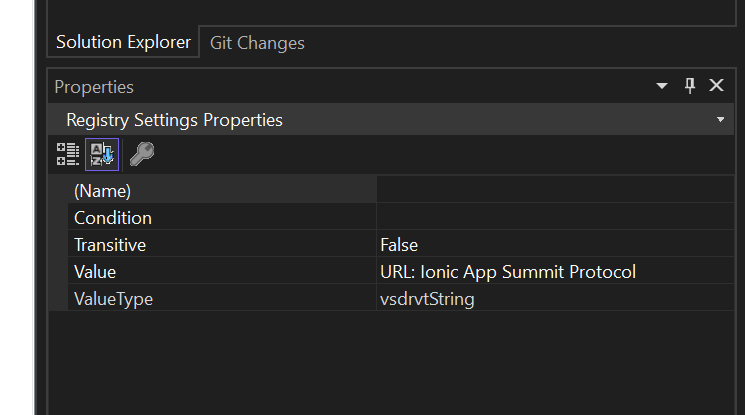
The URL Protocol name needs to match exactly, and the value must be empty. The empty (Default) value should be a description of the URL, of the form URL: Description
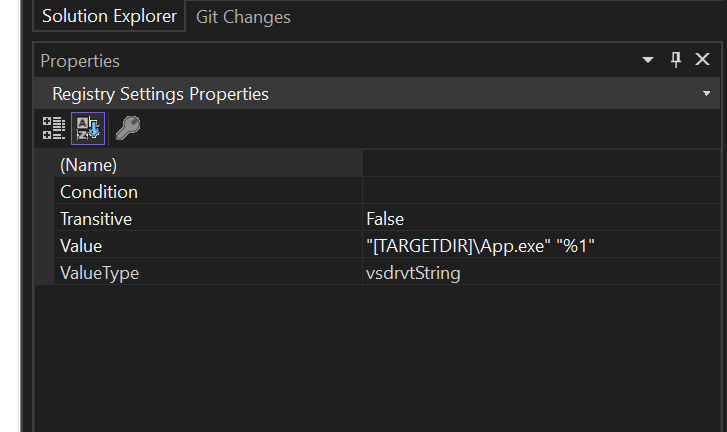
Finally, select the command key, and we will set a default value pointing to the final installed location of the app and set a launch string so any URL used to launch the app will be passed as an argument to the .exe:
Make sure to manually rebuild the installer project each time you make a modification for testing. Rebuilding the solution is not enough, as the setup project is not part of the standard build chain for performance reasons.
Copy the Single Instance Handler#
To ensure only one copy of our app runs, even when new launches happen through URL events, we need to copy over this single instancing utility. To do this, create a new C# file in the App project and name it WpfSingleInstance.cs. Then, paste the following contents into it. Note: you may need to modify the namespace MyApp to match the namespace used elsewhere in your app. Additionally, it's recommended to choose a more unique name for the PipeName value which is used for IPC between two instances of the app, in order to keep them in sync.
using System;using System.Threading;using System.Windows;using System.IO;using System.IO.Pipes;using Capacitor;
namespace MyApp{    public static class WpfSingleInstance    {        private static bool AlreadyProcessedOnThisInstance;        private const string PipeName = "MyAppPipe";
        internal static void Make(string appName, String[] args, bool uniquePerUser = true)        {            if(AlreadyProcessedOnThisInstance)            {                return;            }            AlreadyProcessedOnThisInstance = true;
            Application app = Application.Current;
            string eventName = uniquePerUser                ? $"{appName}-{Environment.MachineName}-{Environment.UserDomainName}-{Environment.UserName}"                : $"{appName}-{Environment.MachineName}";
            bool isSecondaryInstance = true;
            EventWaitHandle eventWaitHandle = null;            try            {                eventWaitHandle = EventWaitHandle.OpenExisting(eventName);            }            catch            {                // This code only runs on the first instance.                isSecondaryInstance = false;            }
            if (isSecondaryInstance)            {                ActivateFirstInstanceWindow(eventWaitHandle);
                IPCClientSendArgs(args);
                // Let's produce a non-interceptable exit (2009 year approach).                Environment.Exit(0);            }
            StartIPCServer();
            RegisterFirstInstanceWindowActivation(app, eventName);        }
        private static void ActivateFirstInstanceWindow(EventWaitHandle eventWaitHandle)        {            // Let's notify the first instance to activate its main window.            _ = eventWaitHandle.Set();        }
        private static void RegisterFirstInstanceWindowActivation(Application app, string eventName)        {            EventWaitHandle eventWaitHandle = new EventWaitHandle(                false,                EventResetMode.AutoReset,                eventName);
            _ = ThreadPool.RegisterWaitForSingleObject(eventWaitHandle, WaitOrTimerCallback, app, Timeout.Infinite, false);
            eventWaitHandle.Close();        }
        private static void WaitOrTimerCallback(object state, bool timedOut)        {            Application app = (Application)state;            _ = app.Dispatcher.BeginInvoke(new Action(() =>            {                _ = Application.Current.MainWindow.Activate();            }));        }
        private static void IPCClientSendArgs(String[] args) {            using (NamedPipeClientStream pipeClient =                new NamedPipeClientStream(".", PipeName, PipeDirection.Out)) {
                try {                    pipeClient.Connect(20000);                    using (StreamWriter wr = new StreamWriter(pipeClient)) {                        wr.WriteLine(String.Join(" ", args));                    }                    pipeClient.Flush();                    pipeClient.Close();                    pipeClient.Dispose();                } catch (Exception e) {                    Console.WriteLine("ERROR: {0}", e.Message);                }            }        }
        private static void StartIPCServer() {            var threadRef = new ThreadStart(() => {                while (true) {                    using (NamedPipeServerStream pipeServer = new NamedPipeServerStream(PipeName, PipeDirection.In)) {                        // Wait for a client to connect                        pipeServer.WaitForConnection();
                        try {                            using (StreamReader re = new StreamReader(pipeServer)) {                                string args = re.ReadToEnd();                                (App.Current as App).HandleArgs(args);                            }
} // Catch the IOException that is raised if the pipe is broken // or disconnected. catch (Exception e) { Console.WriteLine("ERROR: {0}", e.Message); } } } }); var thread = new Thread(threadRef); thread.IsBackground = true; thread.Start(); } }}Update App.xaml.cs#
Next, open the code-behind for App.xaml.cs, and add the UriScheme, OnStartup, and HandleArgs entries to match the below, substituting your custom protocol for the value in UriScheme:
using System;using System.Diagnostics;using System.Windows;
namespace MyApp{    /// <summary>    /// Interaction logic for App.xaml    /// </summary>    public partial class App : Application    {        const string UriScheme = "ionic.cs.appsummit";
        public App() {}
        protected override void OnStartup(StartupEventArgs e) {            WpfSingleInstance.Make("MyApp", e.Args);
            base.OnStartup(e);        }
        public void HandleArgs(string args) {            var parts = args.Split(" ");            if (parts.Length <= 0 ) {                return;            }
            Application.Current.Dispatcher.Invoke(new Action(() => {                if (Uri.TryCreate(parts[0], UriKind.Absolute, out var uri) && string.Equals(uri.Scheme, UriScheme, StringComparison.OrdinalIgnoreCase)) {                    var window = Application.Current.MainWindow as MainWindow;                    if (window != null) {                        window.HandleRedirect(uri);                    }                }            }));        }
}}Update MainWindow.xaml.cs#
Update the MainWindow.xaml.cs file to match:
using System;using System.Collections.Generic;using System.Linq;using System.Text;using System.Threading.Tasks;using System.Web;using System.Windows;using System.Windows.Controls;using System.Windows.Data;using System.Windows.Documents;using System.Windows.Input;using System.Windows.Media;using System.Windows.Media.Imaging;using System.Windows.Navigation;using System.Windows.Shapes;using Capacitor;
namespace MyApp{    /// <summary>    /// Interaction logic for MainWindow.xaml    /// </summary>    public partial class MainWindow : Window    {        CapacitorApp CapacitorAppInstance { get; set; }        public MainWindow()        {            InitializeComponent();            if (OperatingSystem.IsWindowsVersionAtLeast(10, 0, 17763, 0))            {                CapacitorAppInstance = new CapacitorApp(this, this.CapacitorWebView);                CapacitorAppInstance.LoadDefaultPlugins();                CapacitorAppInstance.Load();            }        }
        public void HandleRedirect(Uri uri) {            var js = $@"async function handleACCallback() {{try {{    var u = new URL('{HttpUtility.JavaScriptStringEncode(uri.ToString())}');    if (u.searchParams.get('code')) {{        await window.IonicAuth.handleLoginCallback('{HttpUtility.JavaScriptStringEncode(uri.ToString())}');    }} else {{        await window.IonicAuth.handleLogoutCallback();    }}    if (window.IonicAuth.implementation.lastAuthPopup) {{        window.IonicAuth.implementation.lastAuthPopup.close();    }}}} catch (e) {{    console.error('Error authenticating', e);}}}}handleACCallback();            ";
this.CapacitorWebView.Dispatcher.Invoke(() => { _ = this.CapacitorWebView.ExecuteScriptAsync(js); }); } }}Create a Project.cs file#
In order to ensure our app is single-instanced, we must create a custom Main entry point. To do so, create a new C# file in your App named Program.cs with the following contents:
using System;
namespace MyApp {    internal class Program {
[STAThread] static void Main(string[] args) { App application = new App(); application.InitializeComponent(); application.Run(); } }}Update Project file#
Finally, to use the custom Main entry point, ppen the code behind your main App project file, and inside of the top <PropertyGroup> add the <StartupObject> line as shown below, taking care to match it with the namespace and class name used in the Program.cs file:
<Project Sdk="Microsoft.NET.Sdk">
  <PropertyGroup>    <OutputType>WinExe</OutputType>      <TargetFramework>net5.0-windows10.0.19041.0</TargetFramework>      <TargetPlatformMinVersion>10.0.17763.0</TargetPlatformMinVersion>      <Nullable>enable</Nullable>    <UseWPF>true</UseWPF>    <Platforms>x64</Platforms>    <RuntimeIdentifiers>win-x64</RuntimeIdentifiers>
<!-- ADD THIS --> <StartupObject>MyApp.Program</StartupObject> </PropertyGroup>That's it, your app should now correctly single instance, respond to custom URL protocol launches, and interact with Ionic Auth Connect to handle authentication events.