Capacitor SDK Setup
In order to use Appflow's Live Updates feature you'll need to install and configure the Live Updates SDK. Select this version if you have a Capacitor app.
Installation
Capacitor v5+ is required. Fortunately, migration is fairly easy.
Within your Capacitor app project, install the Live Updates SDK:
npm install @capacitor/live-updates
npx cap sync
With the Live Updates SDK installed, add a "LiveUpdates" configuration section under plugins in capacitor.config.ts (or capacitor.config.json) file:
import { CapacitorConfig } from '@capacitor/cli';

const config: CapacitorConfig = {
  appId: 'com.company.appname',
  appName: 'My Capacitor App',
  webDir: 'www',
  plugins: {
    LiveUpdates: {
      appId: '042a1261',
      channel: 'Production',
      autoUpdateMethod: 'background',
      maxVersions: 2
    }
  }
};

export default config;
SDK Configuration
The Live Updates SDK uses variables to configure the way the SDK behaves.
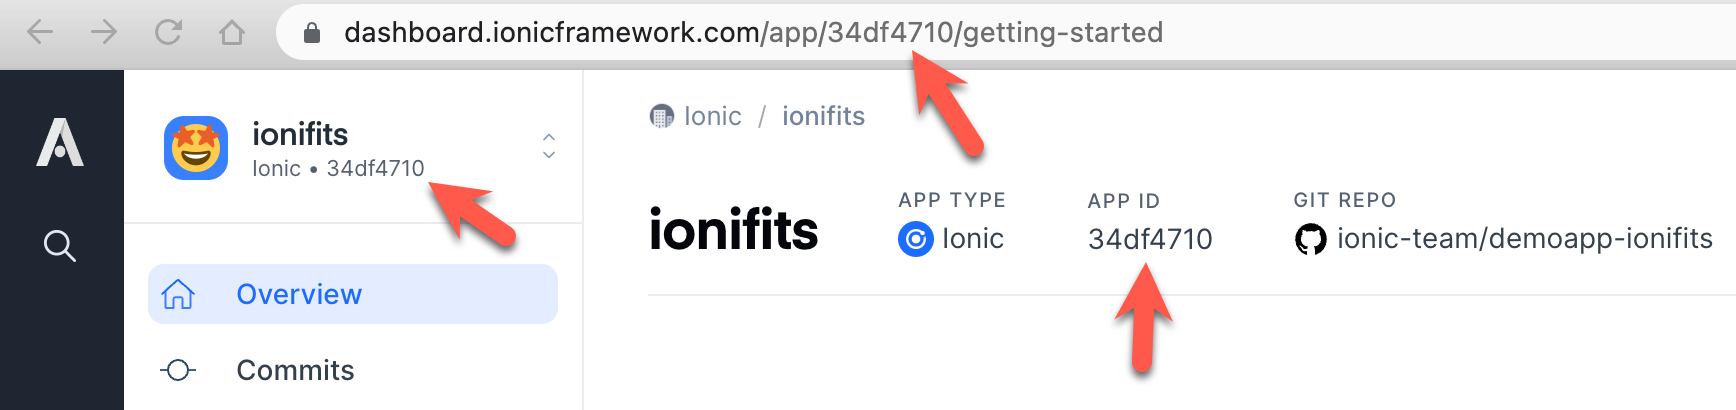
App ID
- Required
- The app id is required to receive updates for an app in the Appflow dashboard. You can find the id on the app overview page.
Channel Name
- Required
- The channel name is required to receive updates for an app in the Appflow dashboard and indicates the channel from which the device will receive updates. Make sure to use the exact name of your channel, including the exact casing!
Auto Update Method
- Default
background - The update method determines how the app will check for and apply live updates from Appflow, including:
background(Recommended) - The app will check for updates in the background and not prolong the amount of time the splash screen is shown. If an update is available, it will be downloaded and installed while the user is using the older version. The next time they launch the app, the new version is loaded.- Always Latest - Live updates are downloaded in the background while the app is in use. After the user opens the app the next time, whether relaunched or after switching between apps, the app is reloaded immediately. This is the best approach for ensuring your app users are (almost) always on the latest version.
- Force Update - Force the application of new live updates immediately on app load. The app will delay the launch of the app by extending how long the splash screen is shown while downloading any available updates.
none- The SDK will not check for or apply updates on its own. This option offers the most control over the user experience since all update logic is applied programmatically using the Live Updates API.
Please see below for more details on applying Live Updates.
Max Versions
- Default
3 - The maximum number of versions of the app to keep cached on device. If you roll back a live update that has been cached on the user's device, it is loaded instantly since it doesn't need to be retrieved from Appflow's servers.
Enabled
- Default
true - Turn off live updates for local development.
Sync Native Projects
With the Live Updates SDK configuration details set (and anytime you change the configuration in the future), build then sync the project to ensure the iOS and Android native projects are updated:
npm run build
npx cap sync
Live Update Strategies
There are several Live Updates strategies you can apply that affect how users receive Live Updates.
Background
In background mode (the default), the app will check for updates in the background and not prolong the amount of time the splash screen is shown. If an update is available, it will be downloaded and installed while the user is using the older version. The next time the app is launched the new live update will be applied.
Set autoUpdateMethod: 'background' in capacitor.config.ts to use background mode. There is no additional code or configuration required - the SDK handles the rest.
Always Latest
In this update strategy, live updates are downloaded in the background while the app is in use. After the user opens the app the next time, whether relaunched or after switching between apps, the app is reloaded immediately. This is the best approach for ensuring your app users are (almost) always on the latest version.
First, set (autoUpdateMethod: 'none') in capacitor.config.ts then install the Capacitor App plugin. We'll use the resume event to fire an event when the app enters the foreground.
npm install @capacitor/app
npx cap sync
Next, add the following code wherever your app startup code is. On app load, it calls LiveUpdates.sync() to check for a new live update and download it. Once the sync call has finished, the activeApplicationPathChanged property is inspected and value saved to Local Storage. This will only be set to true if a new live update was downloaded.
import * as LiveUpdates from '@capacitor/live-updates';

async initializeApp() {
  // Register event to fire each time user resumes the app
  App.addListener('resume', async () => {
    if (localStorage.shouldReloadApp === 'true') {
      await LiveUpdates.reload();
    }
    else {
      const result = await LiveUpdates.sync();
      localStorage.shouldReloadApp = result.activeApplicationPathChanged;
    }
  });

  // First sync on app load
  const result = await LiveUpdates.sync();
  localStorage.shouldReloadApp = result.activeApplicationPathChanged;
}
Eventually, an app user will close your app or switch to another one. When they come back to your app, the resume event will fire. Immediately after this, shouldReloadApp is checked from Local Storage. If true, the app is reloaded before the user has a chance to use the app, updating them to the latest version. If false, another sync() call is made and again the activeApplicationPathChanged property is inspected and saved to Local Storage.
Avoid Interrupting User's Workflow
The above solution will always reload the app when a live update is available. This could be problematic if it interrupts a user's workflow such as when filling out a form or logging in. To minimize this, consider including a shouldBlockReload check placed before any critical workflows that are about to happen. In this example, we toggle it to true right before logging in using Auth Connect then false after the user has authenticated successfully.
public async login() {
  localStorage.shouldBlockReload = true;
  await AuthConnect.login();
  localStorage.shouldBlockReload = false;
}
Then, within the resume listener, update the check that occurs before reloading the app to specify that the app should only be reloaded if there is a live update available and it shouldn't be blocked.
if (
  localStorage.shouldReloadApp === 'true'
  && localStorage.shouldBlockReload === 'false'
) {
  await LiveUpdates.reload();
};
Force Update
Force the application of new live updates immediately on app load. The app will delay the launch of the app by extending how long the splash screen is shown while downloading any available updates. Once the update is available, the new version will be immediately shown and the splash screen will be hidden. We generally don't recommend this mode since it can lead to the splash screen showing for a long time, especially if the user is on a poor network connection.
First, install the Capacitor Splash Screen plugin:
npm install @capacitor/splash-screen
npx cap sync
Next, in capacitor.config.ts set launchAutoHide to false, which will keep the splash screen visible until manually hidden.
const config: CapacitorConfig = {
  plugins: {
    SplashScreen: {
      launchAutoHide: false
    }
  }
};
Next, add the following code wherever your app startup code is. On app load, it calls LiveUpdates.sync() to check for a new live update and download it. Once the sync call has finished, the activeApplicationPathChanged property is inspected and value saved to Local Storage. This will only be set to true if a new live update was downloaded. If a new live update is available, it is applied as the app is reloaded. Otherwise, the splash screen is hidden and the user may use the app.
import { SplashScreen } from '@capacitor/splash-screen';
import * as LiveUpdates from '@capacitor/live-updates';

async initializeApp() {
  const result = await LiveUpdates.sync();
  if (result.activeApplicationPathChanged) {
    await LiveUpdates.reload();
  }
  else {
    await SplashScreen.hide();
  }
}
Dynamic Configuration
A very popular Live Updates update strategy involves setting the Live Updates configuration at runtime. Common use cases include, but are not limited to:
- Set the Live Updates channel based on attributes of the signed-in user.
- Switch between development, staging, and production versions of an app.
- Switch between specific versions of an app, like version number v1.5.2.
- Grant early access to upcoming features to a subset of users.
To accomplish this, first set autoUpdateMethod: 'none' in capacitor.config.ts. Next, in application code use the setConfig method and specify the channel name:
import * as LiveUpdates from '@capacitor/live-updates';

await LiveUpdates.setConfig({
  channel: "staging",
  appId: "456"
});

// Retrieve the latest Live Update for app 456 and from the staging channel
await LiveUpdates.sync();
There are multiple cases where setting the channel (or other config details) is useful. Suppose we want to ship beta features to a subset of customers and determine whether the user should get the main production version of the app or the beta version from the backend.
// Log the user in and get their Live Updates config details from the backend
const loggedInUser = myApi.login();

// Dynamically set the channel and max versions
await LiveUpdates.setConfig({
  channel: loggedInUser.channel,  // could be beta, production, etc.
  maxVersions: loggedInUser.maxVersions
});

// Retrieve the latest Live Update based on the user-specific configuration
await LiveUpdates.sync();
API
You can use the Live Updates SDK API to directly control when live updates are downloaded and when they are applied. Set autoUpdateMethod: 'none' in capacitor.config.ts then see the Live Updates API page.
Build then Deploy a Live Update
With the Live Updates SDK installed and configured, it's time to learn how Live Update web builds and channels work.