Self-hosted Live Updates Setup
This feature is only available on our Enterprise plan
Overview
For our customers with strict security requirements, Self-hosted Live Updates includes enhanced security features built on top of Appflow's already secure delivery mechanisms.
Self-hosted Live Updates allows customers to build and host their web artifacts then deploy them as Live Updates to app users. To help ensure secure end-to-end delivery, code signing and signature verification steps are included as well.
This guide outlines the one-time setup process for Self-hosted Live Updates and instructions on how to include them within your existing CI/CD pipeline.
Requirements
Mobile:
- Capacitor v5+. Need Cordova support? Check out the original Live Update solution featuring Appflow-hosted live updates only.
- User devices running iOS 13+ or Android 5.1+.
Cloud infrastructure:
- High-availability servers that can handle low to medium levels of traffic (varies based on number of app users). Any modern CI/CD platform will suffice, such as AWS, Azure DevOps, Jenkins, etc.
- Integration of the Appflow CLI into a pre-existing or new CI/CD pipeline.
- Hosting of the web build artifacts in Appflow or your cloud storage provider of choice (such as AWS S3 buckets or Azure Storage Blobs)
- [Optional] Leveraging a CDN to distribute live updates around the world and enable faster downloads to end users of your apps
Workflow
Much of the self-hosted live update process is completed within your CI/CD infrastructure, with Appflow and a live update plugin managing the deployments of live updates.
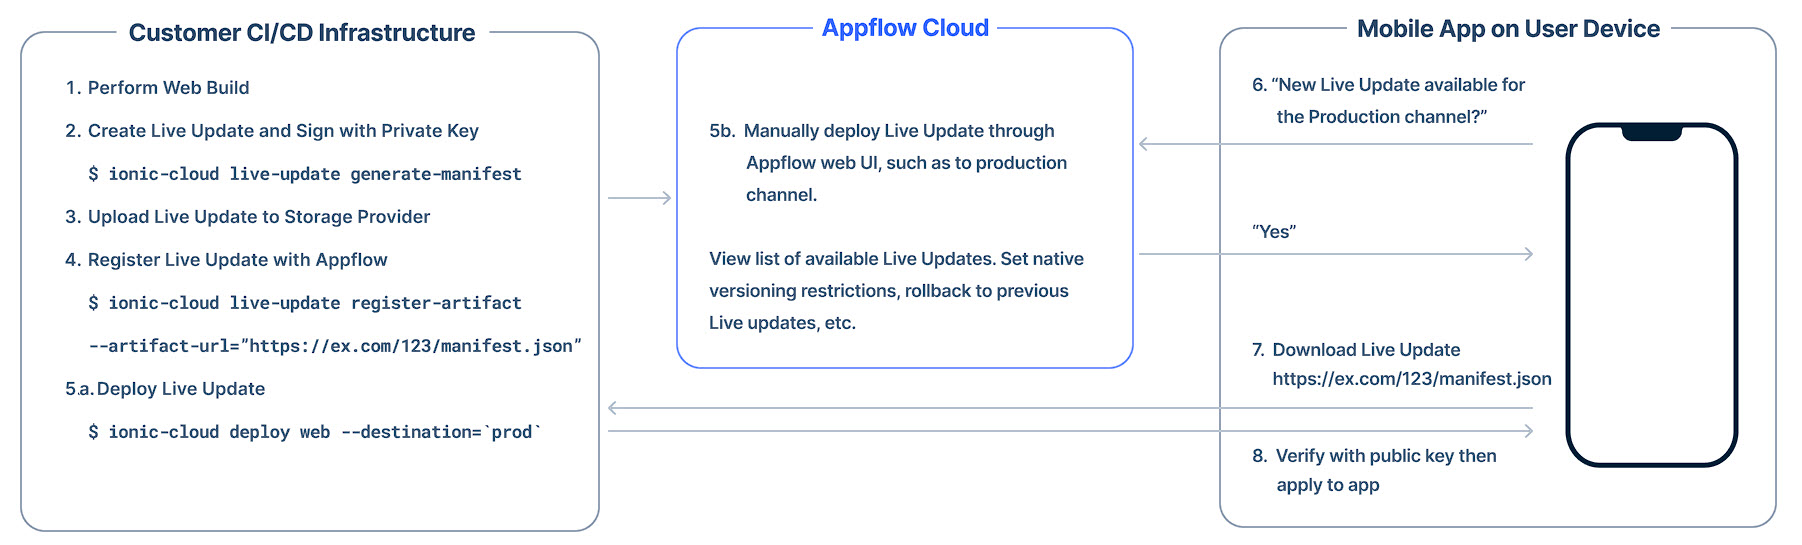
Beginning in your CI/CD system, a web build is performed. The web build is packaged up into a live update bundle and signed with a private key using the Appflow CLI. Next, the live update is uploaded to your storage provider of choice. Then, the live update is registered with Appflow so it knows that a new live update is available. Various metadata is shared with Appflow such as the web URL of the live update. Finally, the live update can be deployed immediately if desired using the Appflow CLI.
Customers can choose to deploy the live update at a later time using the Appflow web UI. Within Appflow, the same capabilities of the classic live update solution are available, including viewing the complete list of live updates, the ability to set native versioning restrictions, and even rollback to previous live updates.
When an app user reopens your mobile app, the live update plugin calls back to Appflow to see if a new live update is available. If it is, it is downloaded to the device. Using a public key embedded in the app, the live update bundle is verified. If the contents are successfully verified, the live update is applied to the mobile app. The next time the user opens the app they will see the new live update changes.
App Setup
The following steps explain the one-time setup process required to configure your app.
Create an App in Appflow
While much of these features are performed within your infrastructure, Appflow still needs to be aware of your app. You'll also manage live update deployments and channels from within the Appflow dashboard. On the Apps screen within Appflow, click the New button then choose "Import existing app." Enter your app's name, select Capacitor as the mobile architecture, then click "Connect git host later." You won't connect your app's code to Appflow at any point.
With the app created, note the APP ID that appears at the top of the screen, like "042a1261." You'll need it shortly.
Download and Configure the Appflow CLI
Use of Self-hosted Live Updates requires using the Appflow CLI for signing, bundling, and uploading Live Update artifacts. It can also generate signing keys for you if you need it to. The Appflow CLI was purpose-built for use within CI/CD systems; it's small and easy to download. Please reference the one-line install instructions.
You'll also need to supply the Appflow CLI with a Personal Access Token for authentication with your Appflow account. The Appflow CLI documentation outlines the available configuration options.
Code Signing: Generate Live Update Signing Keys
Code signing guarantees that the code your developers wrote is the code that is shipped and applied to user devices. Each Live Update web artifact is signed with your private key, then the Live Updates plugin uses the public key to verify integrity of the new update. It is only applied to the user's device if nothing has been modified.
The Appflow CLI includes a command for generating signing keys. This command generates a public and private key pair. The key files are written to the current working directory; these files can be named by passing additional arguments to the following command.
appflow live-update generate-signing-key
The private key is used by the Appflow CLI to sign the Live Update artifact before uploading the artifact to Appflow. The public key needs to be published with your app via the Live Update plugin configuration to verify the signature of the Live Update artifact upon download.
Code Signing: Store Your Private Key
You only need to generate your signing keys once, so once you've generated your key pair, make sure you store your private key somewhere secure and durable. If your private key is lost, you will need to generate a new signing key pair and publish the new public key to your app via a native binary release.
Make sure you also store the private key somewhere that is accessible from your CI/CD system. The private key will need to be passed to the Appflow CLI each time you upload a new Live Update artifact.
While it is technically possible to use the same signing keys for multiple apps, we recommend using unique signing keys for each of your apps.
Install The Live Update Plugin
Within your Capacitor app project, install the Live Update plugin:
npm install @capacitor/live-updates
npx cap sync
Configure Live Updates
With the live update plugin installed, add a "LiveUpdates" configuration section under plugins in capacitor.config.ts (or capacitor.config.json) file. Set appId with the Appflow app id created above, channel to the live update channel that the plugin should listen to for new updates, autoUpdateMethod to "background" to have live updates download in the background and automatically apply the next time the user opens the app, and maxVersions to the maximum number of versions of the app to keep cached on device. The key is the path to the public key created above used to verify the signature of the Live Update artifact upon download. It is recommended to store the public key file at the root of the Capacitor project. strategy refers to the manner in which a live update is generated, either differential for consisting of only the modified files from previous updates (recommended and the default) or zip a zip file containing the entire application.
import { CapacitorConfig } from '@capacitor/cli';

const config: CapacitorConfig = {
  appId: 'com.company.appname',
  appName: 'My Capacitor App',
  webDir: 'www',
  plugins: {
    LiveUpdates: {
      appId: '042a1261',
      channel: 'Production',
      autoUpdateMethod: 'background',
      maxVersions: 2,
      strategy: 'differential',
      key: 'public_key.pem',
    },
  },
};

export default config;
With the live updates plugin configuration details set (and anytime you change the configuration in the future), sync the project to ensure the iOS and Android native projects are updated:
npx cap sync
Choosing a Live Update Strategy
There are multiple strategies to choose from when applying new live updates. View each strategy option here.
Copy Public Key into iOS Project
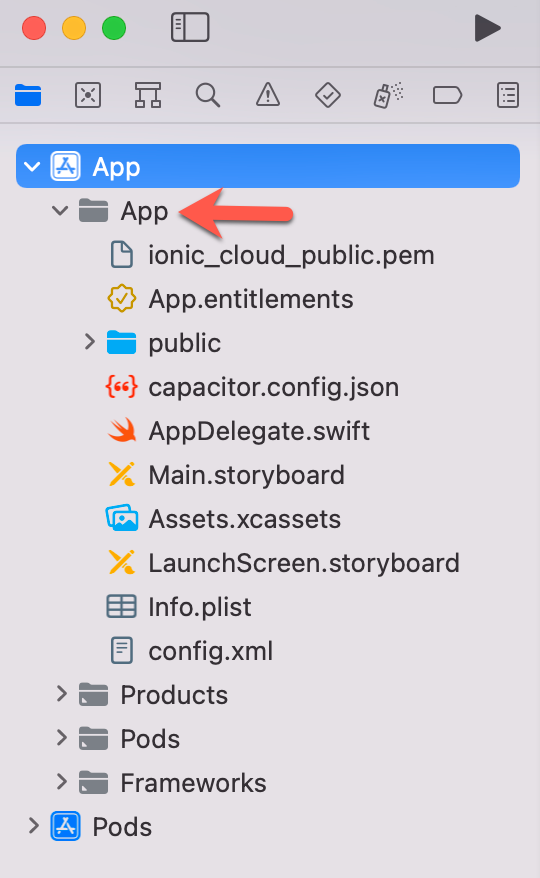
Running the cap sync command will copy the public key into the Android project, but iOS requires a manual step to accomplish the same. Open Xcode (npx cap open ios) then open the project navigator. In the navigator window, right-click on "App" (the folder, not the top level App entry), then choose "Add files to App." Navigate to the public key and click Add. The public key will appear in the navigator, like so ("appflow_public.pem" in the screenshot):
Note that since the Live Updates plugin has been added to the app project, a new native version of the app needs to be deployed to the app store(s) before Live Updates can be used.
CI/CD Pipeline Setup
The following sections outline the additional steps to add to your CI/CD pipeline to publish a Self-hosted Live Update to your app.
Build a Live Update
Using your preferred CI/CD system, perform a build of your app's web resources.
Host the Live Update
Customers can choose to have live update web artifacts stored and hosted in Appflow ("Appflow-hosted") or their cloud storage solution of choice ("self-hosted").
Appflow-hosted
If you choose to have Appflow host your live update web artifacts, your app's build directory will be signed, bundled, and uploaded to Appflow.
The Appflow CLI does the heavy lifting here:
appflow live-update upload-artifact
  --app-id=APP_ID
  --build-dir=DIR
  --commit-ref=BRANCH
  --commit-sha=SHA
  --commit-message=MESSAGE
  --signing-key=IONIC_SIGNING_KEY
  --token=TOKEN
  [--artifact-type=ARTIFACT_TYPE]
app-id: The Appflow App Id created at the top of this guide, such as042a1261.build-dir: The directory where your compiled web app is found, such aswwwfor Angular apps.commit-ref: The branch name of the commit, such as "main" or "production."commit-sha: The Git commit SHA, such as "adf9137y45".commit-message: The Git commit message, such as "Fix login bug."signing-key: Pass the entire private key as a string or the complete file path/name.token: The Appflow personal access token.artifact-type: Set tozipto zip the entire application,manifest(recommended) to create a differential manifest. Defaults tozipif omitted. Will default tomanifestin a future release.
Self-hosted
If you choose to host live update web artifacts in your infrastructure, your app's build directory will be signed, bundled, and uploaded to your storage mechanism of choice. Finally, you'll inform Appflow that a new live update is available.
Complete pipeline examples are available, such as Azure DevOps and Github Actions.
Create a Signed Live Update
Now that the web app has been built, we can use the Appflow CLI bundle-artifact command to create a zip file of the compiled web app assets and its manifest file. The live-update-manifest.json contained within the zip file includes a hash for every file associated with the compiled web app. If a native app has a live update manifest file, local files on disk are compared with the manifest and only changed files are downloaded. This makes the update much smaller and faster, resulting in improved performance over slower connections.
build-dir: The top-level build directory containing the compiled web app, such aswwwfor an Angular app.signing-key: The private key used to sign the live update.token: The Appflow personal access token.
appflow live-update bundle-artifact
  --build-dir=DIR
  --token=TOKEN
  --signing-key=PRIVATE_KEY
Upload Live Update to Storage Provider
With the new live update created, upload it your storage provider of choice. Steps will vary depending on your provider of choice (AWS S3, Azure data storage, etc.). See Azure data storage as an example.
If using the differential strategy (recommended), upload the entire application's files, including the live-update-manifest.json file generated in the previous step. If using the zip strategy, upload the entire application and live update manifest in a zip file.
Register Signed Live Update with Appflow
In this last step, inform Appflow that a new live update is available with the Appflow CLI register-artifact command.
app-id: The Appflow App Id created at the top of this guide, such as042a1261.artifact-type: The type of artifact being registered, eitherzipormanifestfor differential live updates.artifact-url: The URL where the new live update artifact is stored. The Capacitor live update plugin will download the live update from your storage provider. When usingmanifestartifact-type, URL should end withlive-update-manifest.json. When usingzipartifact-type, URL should end with.zip.token: The Appflow personal access token.commit-ref: The branch name of the commit, such as "main" or "production."commit-sha: The Git commit SHA, such as "adf9137y45".commit-message: The Git commit message, such as "Fix login bug."
appflow live-update register-artifact
  --app-id=APP_ID
  --artifact-type=TYPE
  --artifact-url=URL
  --commit-ref=REF
  --commit-sha=SHA
  --commit-message=MESSAGE
  --token=TOKEN
With a new live update now hosted in either Appflow or your storage provider of choice, it's ready to be deployed to your app users!
Deploy the Live Update
Upon completion, you'll find the new live update in your App's Builds list in Appflow. From there, you can follow the standard Live Update flow of assigning the build to a Live Update Channel.