Deeplinking in Ionic Apps

The following is a guide from 2016. We’ve since released a Capacitor guide covering how to implement Universal Links (iOS) and App Links (Android) – available here. No native plugin required! 🎉
I was doing some research on common challenges developers face while building their Ionic apps, and one of the things that kept coming up was Deeplinking.
For those not familiar, Deeplinking makes it possible to direct a user to content hidden deep in a native app, whether that’s from another app or a web browser. As web developers we live and breathe deep-linking because that was the major innovation of the web. Native apps are only just catching up, and so it hasn’t always been obvious how to link into an app the way we link into a webpage.
Deeplinking as a concept has evolved heavily over the last few years, with mobile devices going from supporting custom URL schemes (like instagram://) to now opening native apps in response to navigation to URLs (like amazon.com). Additionally, OS’s now support powerful ways to index and search data inside of native apps. Each evolution in the deeplinking feature set has caused churn in both what mobile devices support and what they no longer support, making it a tall order to keep up.
To help Ionic developers deeplink more easily, we are excited to announce a new, official way to deeplink into both Ionic 1 and Ionic 2 apps (and non-ionic Cordova apps): the Ionic Deeplinks Plugin along with Ionic Native 1.3.0. Let’s take a look at how it works:
Choosing a Deeplink
The first thing we need to do is figure out what kind of deeplink we want our app to respond to. Let’s say we run a Hat Shop and we have a website version of our store where we display our many fancy Hats. A URL to one of those Hats might look like https://ionic-hats.com/hats/very-nice-hat.
We can actually launch our app when someone navigates to this URL on Android or iOS and display the app version of the Hat product page. Additionally, let’s say we want to enable a custom URL scheme of the form ionichats://app/hats/very-nice-hat.
Now that we have our URL scheme, website, and deeplinking path decided, let’s install the Deeplinks Plugin:
Installing Ionic Deeplinks
The Ionic Deeplinks plugin requires some variables in order to get set up properly:
cordova plugin add ionic-plugin-deeplinks --variable URL_SCHEME=ionichats --variable DEEPLINK_SCHEME=https --variable DEEPLINK_HOST=ionic-hats.com
In the install command, we provide the custom URL scheme we want to handle (ionichats), the host domain we will respond to (ionic-hats.com) and the host protocol we will listen for, which 99% of the time will be https as it’s required on iOS and Android.
We’re almost ready to handle deeplinks, we just need to configure Universal Links on iOS and App Links on Android 6.0 so our app can open when navigating to ionic-hats.com.
Configuring Universal Links (iOS) and App Links (Android)
To configure iOS and Android, we need to enable Universal Links for iOS, and App Links for Android (6.0+). This process is primarily done on the server side of your website. You’ll publish a specific json file for iOS and one for Android, ensure your site is using HTTPS, and then configure your app to open in response to links to that domain.
For Android, it pretty much Just Works from the plugin install above. However, for iOS, you’ll then enable the domain in the Associated Domains section of your entitlements, with the form applinks:yourdomain.com:
You may also need to enable the entitlement from the Developer center for your app.
Testing Deeplinks
Assuming we have everything set up correctly (or at least we think we do), it’s time to start testing Deeplinks.
On Android, this process is a snap. We can boot up our emulator or device, and send a deeplink intent directly to the app from the command line:
adb shell am start -a android.intent.action.VIEW -d "ionichats://app/hats/very-nice-hat" io.ionic.hats
Replacing the custom URL scheme and package name with your respective values. If everything was configured properly, our app will open, regardless of whether it was running or not!
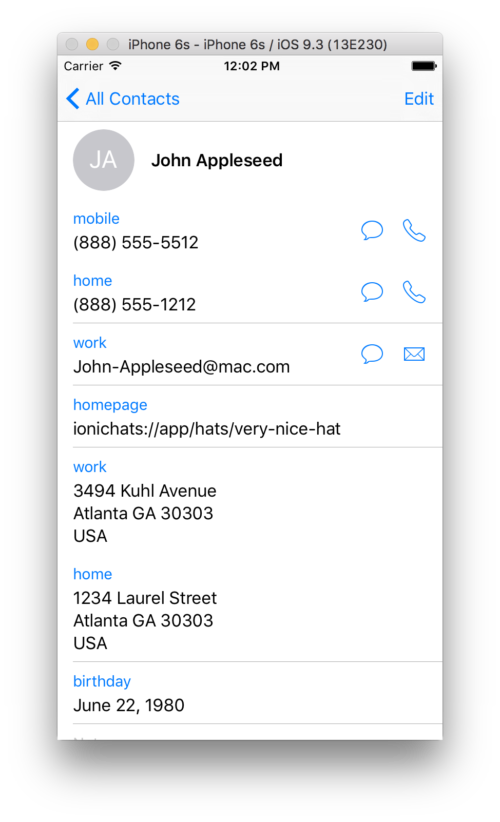
On iOS, I find it’s easier to test on the simulator. Start your app from X Code, go into the Contacts app and add a URL for one of the fake contacts so it looks like this:
Tap on the link and our app should open!
To test Universal Links on iOS, we can’t use the simulator (as far as I know, I couldn’t get it to work). Instead, we run our app on our iOS device, open safari and navigate to our URL. In Safari, when open on a page that has Universal Links enabled, we can swipe down to expose this bar:
Universal Links on iOS are finicky. If you adjust the manifest, you’ll need to uninstall and reinstall the app in order for iOS to fetch it again, otherwise it’ll cache for 24 hours.
If you are sure you’ve got everything configured properly but it’s still not working, double check your bundle identifer matches up with the manifest, you have the proper entitlements, you’re using HTTPS, you are sending application/pkcs7-mime as the content type for the manifest file, and try removing/installing the app again. (Here’s an example express.js route for serving the manifest for iOS)
Responding to Deeplinks
Getting the app configured is by far hardest part, and Universal Links is particularly finicky.
Now that we (hopefully) have everything configured, it’s time to actually respond to our deeplinks!
I’m going to assume you’re using Ionic 2 with Ionic Native which comes with convenient wrappers around many Cordova plugins to add Observable, Promise, and TypeScript support. Ionic Native works in any Cordova project regardless of whether it’s using Ionic 1/2, Angular 1/2, or TypeScript. See the Deeplinks README for examples for Ionic 1 and non-Ionic projects.
To start, we define a set of deeplink routes we want to listen for. If one matches against an incoming deeplink, we can automatically navigate in our app to display the appropriate content.
In Ionic 2, we can conveniently navigate with a specific instance of a Nav Controller, though we can also use the plain route method to handle the navigation ourselves (for example, if we want to do a very custom deeplink navigation).
import {Component, ViewChild} from '@angular/core';
import {Platform, Nav, ionicBootstrap} from 'ionic-angular';
import {Deeplinks} from 'ionic-native';

import {AboutPage} from './pages/about/about';
import {HatDetailPage} from './pages/hat/hat';

@Component({
  template: '<ion-nav [root]="rootPage"></ion-nav>',
})
class MyApp {
  @ViewChild(Nav) nav:Nav;

  constructor(private _platform: Platform) {}

  ngAfterViewInit() {
    this._platform.ready().then(() => {
      Deeplinks.routeWithNavController(this.nav, {
        '/about-us': AboutPage,
        '/hats/:hatId': HatDetailPage
      });
    });
  }
});

ionicBootstrap(MyApp);
Inside of our HatDetailPage, we can grab the hatId from the route:
export class HatDetailPage {
  hatId: string;

  constructor(public nav: NavController, private _params: NavParams) {
    this.hatId = _params.get('hatId');
  }
}
Take a look at a simple demo for Ionic 2 and one for Ionic 1 to see how the two differ.
Conclusion
That’s pretty much it! A lot of the work happens behind the scenes to make sure our app opens from both custom URL schemes and Universal Links, and that it functions from a cold boot (a deeplink received while the app is not running) as well as while running.
Many people often confuse deeplinking with routing. The two are similar but subtly different. Routing helps an app navigate within itself while it’s running, as well as possibly from external links (especially in a traditional web app). Deeplinking, by contrast, is not used within the app for its own navigation, it’s only used to display a specific piece of content triggered from an external request. In that sense, you would not use the Deeplinks class for your own routing, only to enable the app to be launched from elsewhere on a user’s device.
If you give the new plugin a try, let us know what you think. We are looking for feedback on how to make this easier, and plan to make Deeplinking a major feature in Ionic apps going forward.


