Ionic 2 and Auth0
TL;DR: Implementing modern authentication and identity can be tricky. Fortunately, Auth0 makes it really easy to get up and running quickly and without any friction. With Auth0 you can use any social identity provider and have features like multifactor authentication, single sign-on, and more, all at the flip of a switch. In this tutorial we’ll implement authentication in an Ionic 2 app and show how to use refresh tokens. Check out the repo to go straight to the code.
Implementing authentication isn’t quite as simple as it used to be. Features like social login, multifactor authentication, and single sign-on are complicated, error-prone, and generally tough to write from scratch. It’s doable, but it’s time consuming. Instead of worrying about those details, we should be focusing on our application’s business logic. With Auth0, we can.
Auth0 loves Angular and Ionic, and that’s why we’ve created several libraries for them that make it easy to handle authentication with JSON Web Tokens. Today we’ll see how easy it is to use one of those libraries called angular2-jwt along with Auth0 to make authentication a breeze.
Getting Started
To get started, sign up for your free Auth0 account. With Auth0’s free plan you can have up to 7,000 regular active users and use two social identity providers. A user is considered active if they’ve logged in some time in the last 30 days. This is huge, especially considering that most companies only have 15% of their userbase active at a time.
Auth0 issues a JSON Web Token (JWT) on every login, which is the perfect solution for protecting your data API.
It’s assumed that you already have an Ionic 2 app going. If you don’t, follow the getting started guide to get up and running.
Add the Dependencies
The only dependency from NPM outside of a regular Ionic 2 installation we’ll need is angular2-jwt. We developed this library to help with sending authenticated HTTP requests and also to provide a utility for decoding JWTs.
npm install angular2-jwt
We also need the Auth0Lock library to use the Lock widget. This can be added to the index.html file.
  ...

  <!-- Auth0 Lock script -->
  <script src="https://cdn.auth0.com/js/lock-9.0.min.js"></script>

  <!-- Setting the right viewport -->
  <meta name="viewport" content="width=device-width, initial-scale=1.0, maximum-scale=1.0, user-scalable=no" />

  ...
Configure angular2-jwt
We need to configure angular2-jwt in the providers array of our @App decorator. For this, we’ll need to bring in provide from angular2/core as well.
// app/app.ts

import {App, Platform} from 'ionic-angular';
import {TabsPage} from './pages/tabs/tabs';
import {provide} from 'angular2/core';
import {Http} from 'angular2/http'
import {AuthHttp, AuthConfig} from 'angular2-jwt';
import {Type} from 'angular2/core';
import {AuthService} from './services/auth/auth';


@App({
  template: '<ion-nav [root]="rootPage"></ion-nav>',
  config: {},
  providers: [
    provide(AuthHttp, {
      useFactory: (http) => {
        return new AuthHttp(new AuthConfig(), http);
      },
      deps: [Http]
    }),
    AuthService
  ]
})

...
Create an Authentication Service
For this simple demo app, the user will only be able to log in from the profile page; however, we should make our authentication logic flexible such that it can be used in other places within the app too. For this, its best if we extract authentication to its own service and then inject that service wherever necessary.
Let’s create AuthService in app/services/auth/auth.ts
// app/services/auth/auth.ts

import {Storage, LocalStorage} from 'ionic-angular';
import {AuthHttp, JwtHelper, tokenNotExpired} from 'angular2-jwt';
import {Injectable} from 'angular2/core';
import {Observable} from 'rxjs/Rx';

// Avoid name not found warnings
declare var Auth0Lock: any;

@Injectable()
export class AuthService {
  jwtHelper: JwtHelper = new JwtHelper();
  lock = new Auth0Lock(AUTH0_CLIENT_ID, AUTH0_DOMAIN);
  local: Storage = new Storage(LocalStorage);
  user: Object;

  constructor(private authHttp: AuthHttp) {
    // If there is a profile saved in local storage
    this.local.get('profile').then(profile => {
      this.user = JSON.parse(profile);
    }).catch(error => {
      console.log(error);
    });
  }

  public authenticated() {
    // Check if there's an unexpired JWT
    return tokenNotExpired();
  }

  public login() {
    // Show the Auth0 Lock widget
    this.lock.show({
      authParams: {
        scope: 'openid offline_access',
        device: 'Mobile device'
      }
    }, (err, profile, token, accessToken, state, refreshToken) => {
      if (err) {
        alert(err);
      }
      // If authentication is successful, save the items
      // in local storage
      this.local.set('profile', JSON.stringify(profile));
      this.local.set('id_token', token);
      this.local.set('refresh_token', refreshToken);
      this.user = profile;
    });
  }

  public logout() {
    this.local.remove('profile');
    this.local.remove('id_token');
    this.local.remove('refresh_token');
    this.user = null;
  }
}
We’ve got an authenticated method returning a call to tokenNotExpired which will check whether there is an unexpired JWT in local storage. From a client side perspective, this will be the determining factor for whether the user is logged in or not.
We’ve set up an instance of the Lock widget at the top and this is where you need to supply your own Auth0 credentials. The login method makes a call to lock.show and if authentication is successful, it saves the user’s profile, JWT, and refresh token in local storage. The JWT (which is named id_token) is what we’ll attach as an Authorization header in HTTP requests, and the refresh_token will be used to get a new JWT when the current one expires. We’ll set up the refreshing a little later.
The logout method simply removes these items from local storage and sets the user property to null, which is all we need to do to log the user out on the client side.
Create the Profile Page
With the AuthService in place, let’s put in the profile page. Create a new folder in the pages directory and give it both a profile.html and a profile.ts file.
Tip: You can also generate page folders and files automatically from the command line with
ionic g page profile
Now in profile.ts we can set up the page.
// app/pages/profile/profile.ts

import {Page} from 'ionic-angular';
import {AuthService} from '../../services/auth/auth';

@Page({
  templateUrl: 'build/pages/profile/profile.html',
})
export class ProfilePage {

  // We need to inject AuthService so that we can
  // use it in the view
  constructor(private auth: AuthService) {}
}
The AuthService just needs to be injected in the constructor and we’ll be able to use it in the template.
The template should show a simple contact card with the user’s details if they are authenticated.
  <!-- app/pages/profile/profile.html -->

  <ion-navbar *navbar>
    <ion-title>Profile</ion-title>
  </ion-navbar>

  <ion-content padding *ngIf="!auth.authenticated()">

    <button block (click)="auth.login()">Login</button>

  </ion-content>

  <ion-content padding *ngIf="auth.authenticated()">

    <ion-card>

      <ion-item *ngIf="auth.user">
        <ion-avatar item-left>
          <img src="{{ auth.user.picture }}">
        </ion-avatar>
        <h2>{{ auth.user.nickname }}</h2>
        <p>{{ auth.user.email }}</p>
      </ion-item>

    </ion-card>

    <button block (click)="auth.logout()">Logout</button>

  </ion-content>
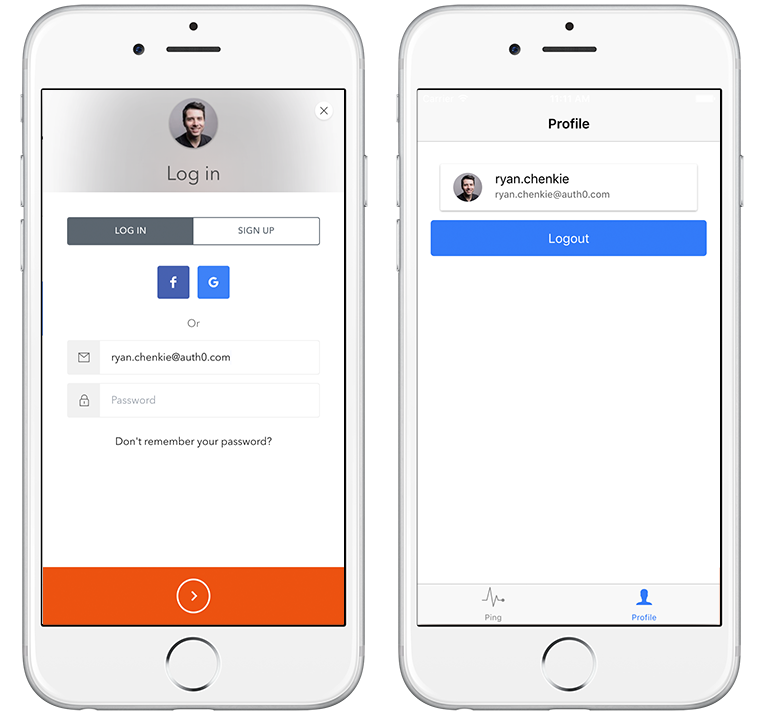
Now let’s try logging in! You can either create a user in your Auth0 dashboard, or you can sign one up from the Lock widget.
The data returned in profile by Auth0 is nicely formatted and normalized across identity providers, which is very great for easily accessing properties like the user’s avatar, name, and email. Here is the JSON that is returned when I log in with standard username and password:
{
  "email":"ryan.chenkie@auth0.com",
  "picture":"https://s.gravatar.com/avatar/a471a41d23efb638d79e3138eaedba50?s=480&r=pg&d=https%3A%2F%2Fcdn.auth0.com%2Favatars%2Fry.png","name":"ryan.chenkie@auth0.com",
  "nickname":"ryan.chenkie",
  "app_metadata": {
    "roles": ["user"]
  },
  "roles": ["user"],
  "email_verified": true,
  "clientID":"{clientId}",
  "updated_at":"2016-02-25T18:05:59.398Z",
  "user_id":"auth0|{userId}",
  "identities": [{
    "user_id":"{userId}",
    "provider":"auth0",
    "connection":"Username-Password-Authentication",
    "isSocial":false
  }],
  "created_at":
  "2016-02-18T18:11:21.679Z",
  "global_client_id":"{globalClientId}"
}
Make Authenticated HTTP Requests
With the user’s JWT in local storage, we can now make authenticated calls to our server. Auth0 has SDKs for nearly all popular backend frameworks and languages. Find the one that’s right for you in the docs and set up your secret key on your server to protect your API.
Let’s create a simple page called ping that will send HTTP requests.
// app/pages/ping/ping.ts

import {Page} from 'ionic-angular';
import {Http} from 'angular2/http';
import {AuthHttp} from 'angular2-jwt';
import {AuthService} from '../../services/auth/auth';
const map = require('rxjs/add/operator/map');

@Page({
  templateUrl: 'build/pages/ping/ping.html',
})
export class PingPage {
  message: string;
  error: string;

  constructor(private http: Http, private authHttp: AuthHttp, private auth: AuthService) {

  }

  ping() {
    // Change the endpoint up for
    // one that points to your own server.
    this.http.get('http://example.com/ping')
      .map(res => res.json())
      .subscribe(
        data => this.message = data,
        err => this.error = err
      );
  }

  securedPing() {
    // Here we use authHttp to make an authenticated
    // request to the server. Change the endpoint up for
    // one that points to your own server.
    this.authHttp.get('http://example.com/secured/ping')
      .map(res => res.json())
      .subscribe(
        data => this.message = data,
        err => this.error = err
      );
  }

}
The securedPing method uses the AuthHttp class from angular2-jwt which automatically attaches the user’s JWT as an Authorization header.
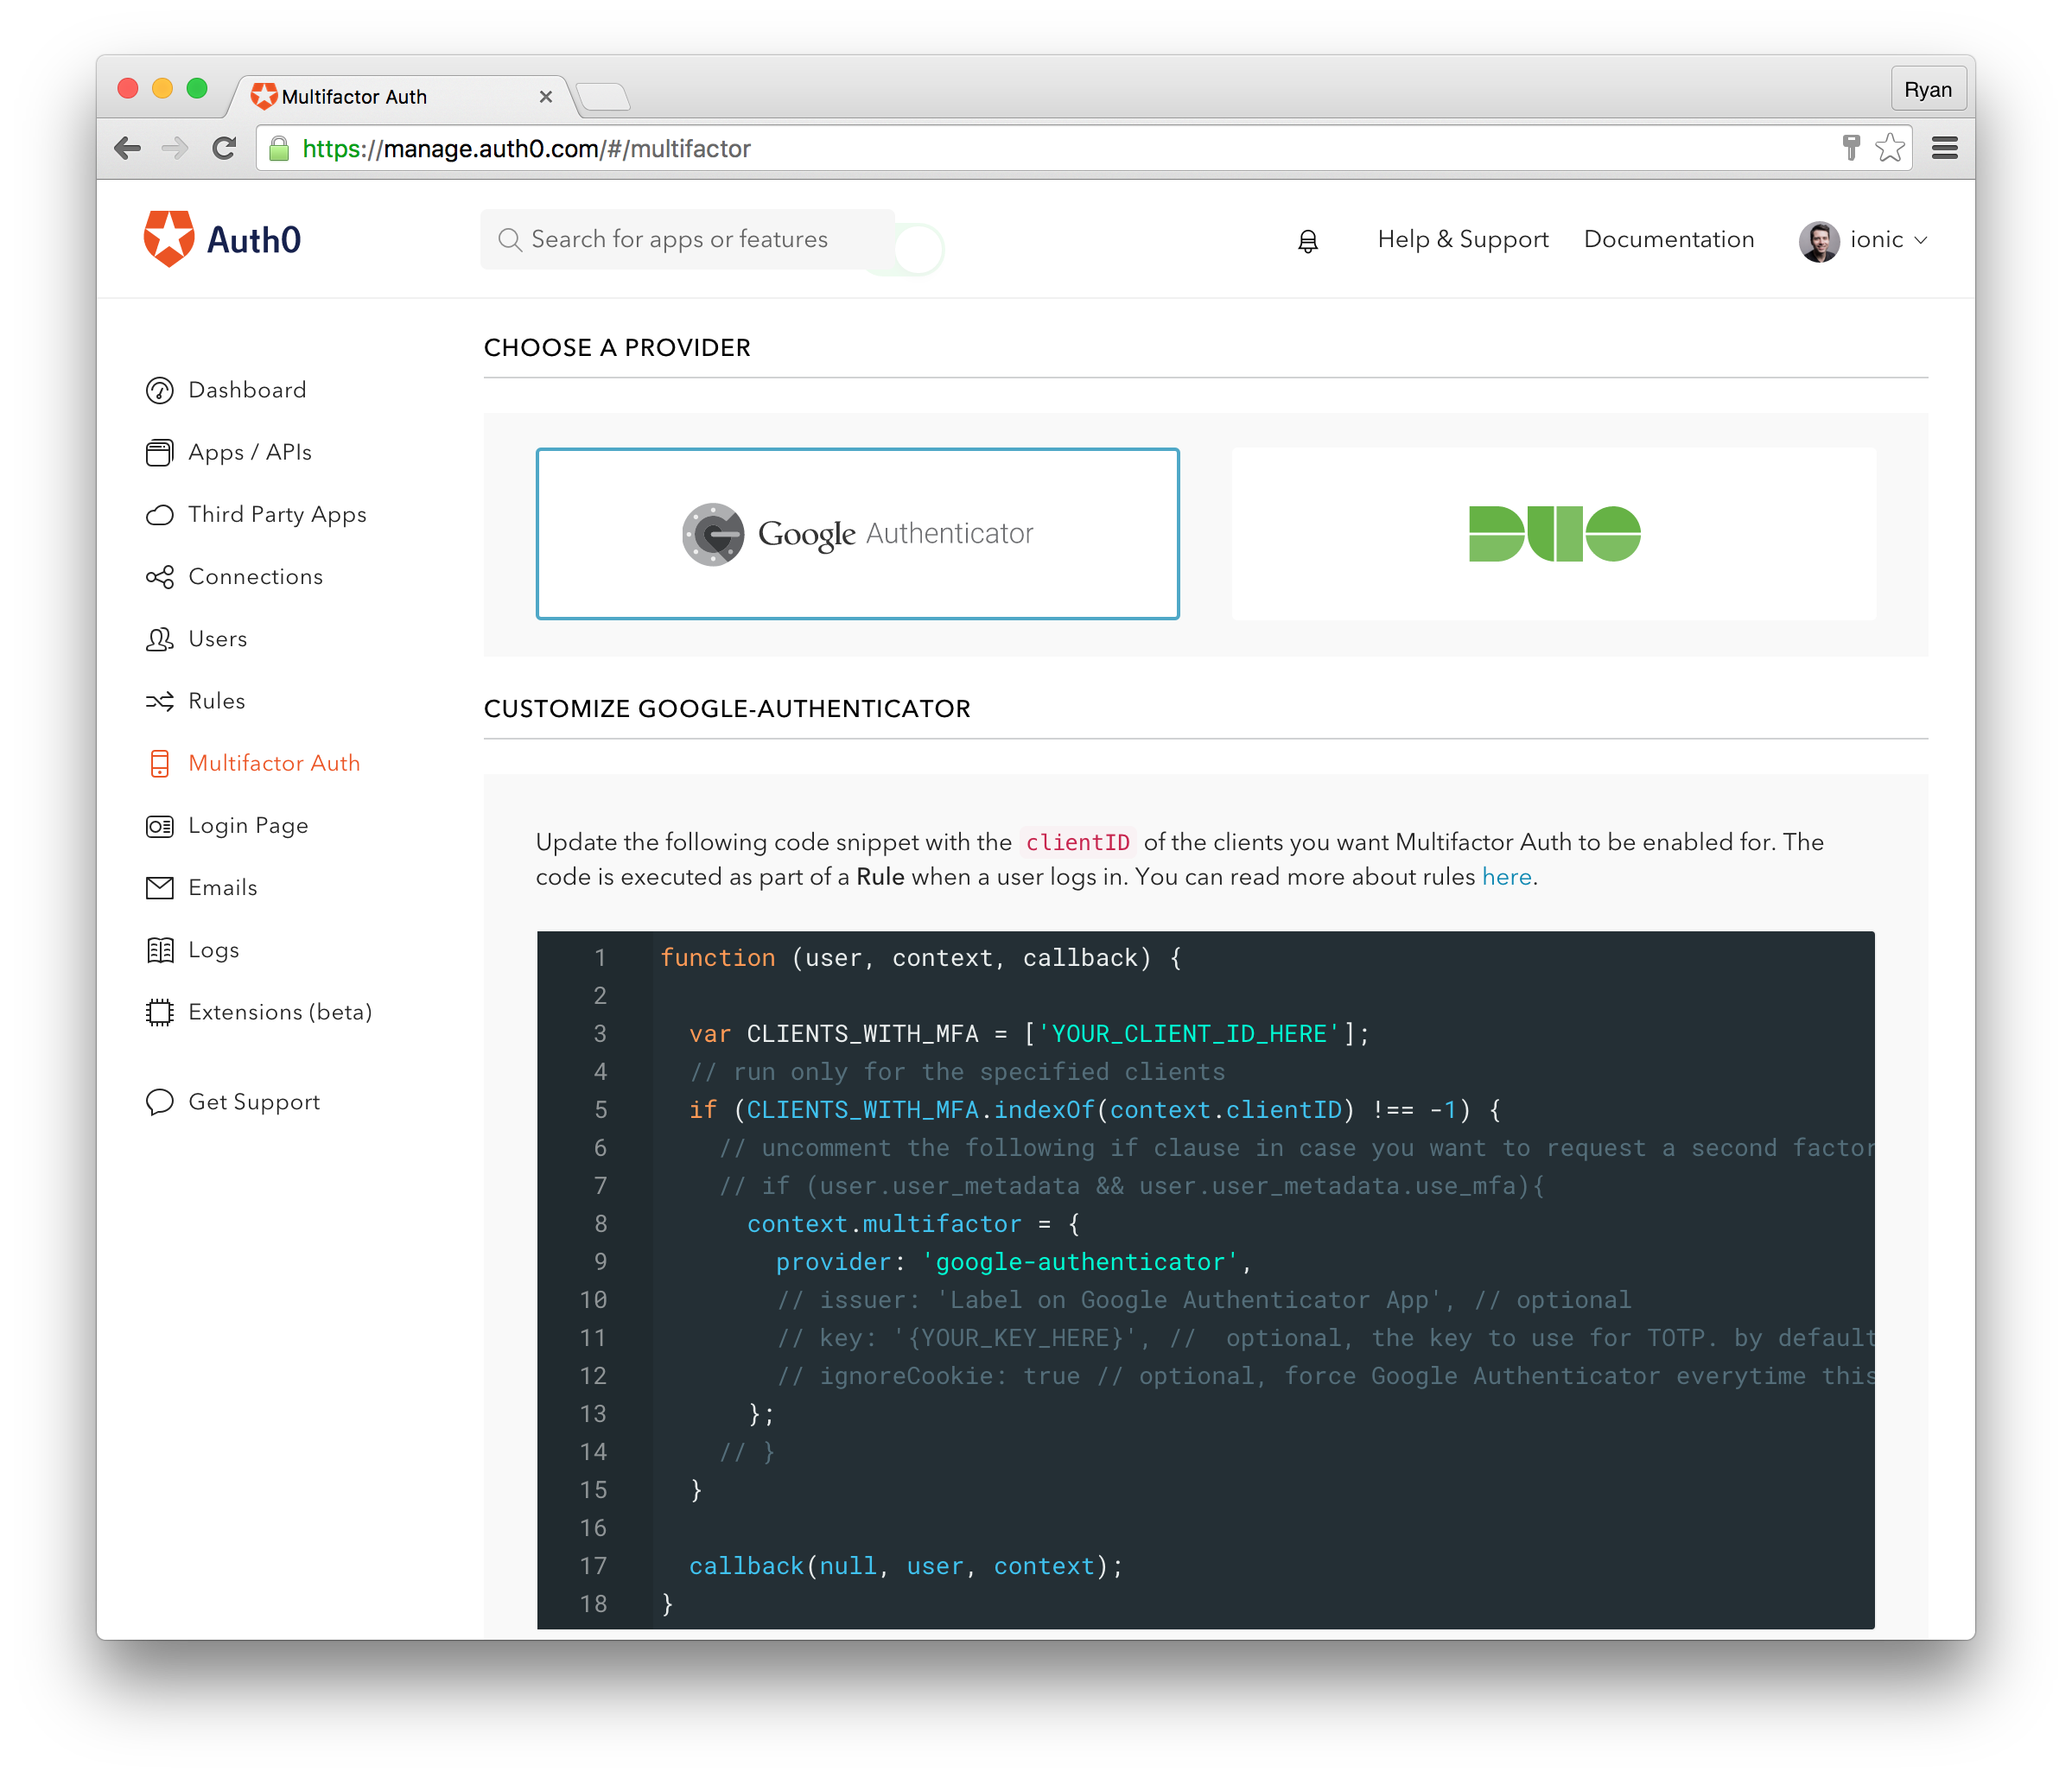
Enable Multi-Factor Authentication
Enabling two-step authentication for your app is easy. Head over to the Multifactor Auth link in your dashboard and flip the switch to “on”. You’ll be presented with a code snippet to edit where you need to add the clientId of any apps you want to enable multi-factor auth for. Finally, select a provider (either Google Authenticator or Duo) and you’re good to go!
Now when your users log in they will need to use Google Authenticator and provide an access code.
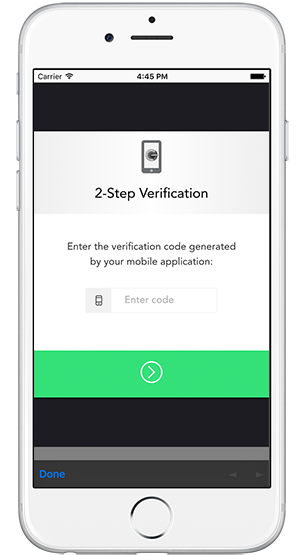
By default, the user won’t need to use multifactor authentication again for 30 days. This can be changed by uncommenting ignoreCookie: true in the rule above.
Set Up Token Refreshing
Refresh tokens are special tokens that can be used to get a new JWT for the user. We’ve already saved the user’s refresh token in local storage when they successfully authenticated, so now we have to set up some logic to automatically grab a new JWT at the right time.
In Angular 1.x, the recommended approach for retreiving a new JWT with a refresh token is to add some logic to an HTTP interceptor that checks if the JWT is expired and sends a request for a new token if it is. Angular 2 doesn’t have the same concept of global interceptors that can modify behavior when a request is made, so we have to take a different approach.
There are a couple different ways we could implement token refreshing in Angular 2 and today we’ll see how to use observables to set up scheduled refreshing. Basically we want to create a method called scheduleRefresh that will be run when the user logs in. It will find out how long the JWT is valid for and will schedule a refresh at the appropriate time.
// app/services/auth/auth.ts

export class AuthService {
  ...
  refreshSubscription: any;

  ...

  public scheduleRefresh() {
    // If the user is authenticated, use the token stream
    // provided by angular2-jwt and flatMap the token
    let source = this.authHttp.tokenStream.flatMap(
      token => {
        // The delay to generate in this case is the difference
        // between the expiry time and the issued at time
        let jwtIat = this.jwtHelper.decodeToken(token).iat;
        let jwtExp = this.jwtHelper.decodeToken(token).exp;
        let iat = new Date(0);
        let exp = new Date(0);

        let delay = (exp.setUTCSeconds(jwtExp) - iat.setUTCSeconds(jwtIat));

        return Observable.interval(delay);
      });

    this.refreshSubscription = source.subscribe(() => {
      this.getNewJwt();
    });
  }

  public startupTokenRefresh() {
    // If the user is authenticated, use the token stream
    // provided by angular2-jwt and flatMap the token
    if (this.authenticated()) {
      let source = this.authHttp.tokenStream.flatMap(
        token => {
          // Get the expiry time to generate
          // a delay in milliseconds
          let now: number = new Date().valueOf();
          let jwtExp: number = this.jwtHelper.decodeToken(token).exp;
          let exp: Date = new Date(0);
          exp.setUTCSeconds(jwtExp);
          let delay: number = exp.valueOf() - now;

          // Use the delay in a timer to
          // run the refresh at the proper time
          return Observable.timer(delay);
        });

       // Once the delay time from above is
       // reached, get a new JWT and schedule
       // additional refreshes
       source.subscribe(() => {
         this.getNewJwt();
         this.scheduleRefresh();
       });
    }
  }

  public unscheduleRefresh() {
    // Unsubscribe fromt the refresh
    if (this.refreshSubscription) {
      this.refreshSubscription.unsubscribe();
    }
  }

  public getNewJwt() {
    // Get a new JWT from Auth0 using the refresh token saved
    // in local storage
    this.local.get('refresh_token').then(token => {
      this.lock.getClient().refreshToken(token, (err, delegationRequest) => {
        if (err) {
          alert(err);
        }
        this.local.set('id_token', delegationRequest.id_token);
      });
    }).catch(error => {
      console.log(error);
    });
  }
}
There’s quite a bit going on here, so let’s break it down by method.
scheduleRefresh– angular2-jwt provides an observable with the user’s JWT and here we are usingflatMapto access it and find out how long it is valid for. We’re then returning a new observable with an interval equal to this amount of time as thedelayand subscribing to it so we can call the method for getting the new JWT after that amount of time.-
startupTokenRefresh– the amount of time that we use for our interval in thescheduleRefreshmethod is for cases where we have a “fresh” token, or in other words, the token we get when the user first logs in. We also need to consider cases when the user comes back to the app after closing it. In this case, the app’s state will be refreshed, so we’ll need to find out if there is an unexpired JWT in local storage, and if so, we’ll need to schedule a refresh. This refresh will be a bit different though. The amount of time to wait before refreshing will be less than if we have a “fresh” token. We’ll also only want to do one of these “startup” refreshing once, so we use anObservable.timerinstead ofObservable.interval. When we subscribe to the source observable in this method, we get the new JWT and we also callscheduleRefreshto set up further refreshing. -
unscheduleRefresh– when the user logs out, we want to unsubscribe from any token refreshing -
getNewJwt– we can uselock.getClient().refreshTokento send a request to the/delegationendpoint. If this endpoint receives a valid refresh token, it will return a new JWT.
Now we need to adjust the login and logout methods to use these new methods.
// app/services/auth/auth.ts

...

public login() {
  // Show the Auth0 Lock widget
  this.lock.show({
    ...

  }, (err, profile, token, accessToken, state, refreshToken) => {
    if (err) {
      alert(err);
    }
    ...

    // Schedule a token refresh
    this.scheduleRefresh();
  });
}

public logout() {
  ...

  // Unschedule the token refresh
  this.unscheduleRefresh();
}

...
Finally, we need to call startupTokenRefresh when the app is ready.
// app/app.ts

...

export class MyApp {
  rootPage: Type = TabsPage;

  constructor(platform: Platform, private authHttp: AuthHttp, private auth: AuthService) {
    platform.ready().then(() => {

      // When the app starts up, there might be a valid
      // token in local storage. If there is, we should
      // schedule an initial token refresh for when the
      // token expires
      this.auth.startupTokenRefresh();

    });
  }
}
Wrapping Up
Awesome, we’ve successfully implemented authentication in an Ionic 2 app without a whole lot of effort! It can be difficult to code modern authentication features from scratch but, as we’ve seen, Auth0 does this hard work for us. We’ve really only scratched the surface too. Auth0 has a lot more to offer, including integration with enterprise systems such as SAML, Active Directory, and others. To find out more about integrating Auth0 in your app, visit the docs page or drop us a line!