How to Create Background Tasks in Ionic with Capacitor
This is a guest post from Simon Grimm, Ionic Developer Expert and educator at the Ionic Academy, an online school with 70+ video courses focused entirely on building awesome mobile apps with Ionic and Capacitor!
What happens when users put your mobile app in the background? Can you still occasionally tap into the device’s resources to perform tasks? The answer is yes, and Capacitor makes it easy to do so now with the new Capacitor Background Runner.
In this tutorial, we will learn how to use the new Background Runner plugin to perform tasks such as fetching data, sending notifications, or even getting the user’s geolocation. We will also learn how to debug and trigger background tasks directly from Xcode.
You can also find the full source code on GitHub. But before we get into the plugin, let’s first take a look at what background tasks are and why we need them.
Background Tasks in Mobile Apps
When building mobile apps, we often have to deal with tasks that should run in the background, like checking for new emails, updating chat messages, or syncing data. In the past, this was only possible with native code, but now we can do it with Capacitor as well.
The idea is to define a task that you will run in the background and either dispatch it manually from your code or let the OS trigger it automatically on a given interval.
However, the second option proves very challenging in reality. Because even if you tell iOS to perform your background task every 5 minutes, your code will most likely get executed every 2 hours.
This is because iOS will try to optimize the battery life of the device and only run background tasks when it thinks it’s a good time to do so. This is why you should never rely on background tasks to run at a specific time.
However, you can still use this to update your app’s data before a user opens it again or to send a local notification to the user.
It can also offload some work from the main thread to the background thread – and we will see all of that in action.
If you want to learn more about this, check out the Capacitor Livestream about Background Tasks!
Setting up the Project with Background Runner
To get started, bring up a terminal, create a new Ionic app, and install the Capacitor Background Runner:
ionic start backgroundApp blank --type angular
cd ./backgroundApp
npm install @capacitor/background-runner
ionic cap add ios
ionic cap add android
Next, we need to add a file that holds our background tasks, so simply create one at src/app/runners/runner.js and leave it empty for the moment. To make sure this file is copied when building the app, we need to bring up the angular.json and include it in the assets array like this:
{
  "projects": {
    "app": {
      "architect": {
        "build": {
          "options": {
            "assets": [
              {
                "glob": "**/*",
                "input": "src/assets",
                "output": "assets"
              },
              {
                "glob": "**/*.svg",
                "input": "node_modules/ionicons/dist/ionicons/svg",
                "output": "./svg"
              },
              {
                "glob": "runner.js",
                "input": "src/app/runners",
                "output": "./runners"
              }
            ]
          }
        }
      }
    }
  }
}
Now we also need to specify some information for Capacitor so the plugin can pick up the file and eventually an event that we can trigger from our code. To do so, open the capacitor.config.ts and change it like this:
import { CapacitorConfig } from '@capacitor/cli';

const config: CapacitorConfig = {
  appId: 'com.capacitor.background',
  appName: 'backgroundApp',
  webDir: 'www',
  server: {
    androidScheme: 'https',
  },
  plugins: {
    BackgroundRunner: {
      label: 'com.capacitor.background.check',
      src: 'runners/runner.js',
      event: 'checkIn',
      repeat: true,
      interval: 30,
      autoStart: true,
    },
  },
};

export default config;
The most important part is that the plugin has a similar label to your appId! This is important because otherwise, the plugin won’t be able to find your file or execute the task. The time we specify here is more a friendly request to the OS as mentioned before, we are not guaranteed to get executed at this time.
Native App Configuration
To make sure our app can run in the background, we need to add some configuration to our native apps as well.
iOS
For iOS we first need to update the ios/App/App/AppDelegate.swift file and change one function and add another:
import UIKit
import BackgroundTasks
import Capacitor
import CapacitorBackgroundRunner

@UIApplicationMain

class AppDelegate: UIResponder, UIApplicationDelegate {

    var window: UIWindow?

    func application(_ application: UIApplication, didFinishLaunchingWithOptions launchOptions: [UIApplication.LaunchOptionsKey: Any]?) -> Bool {
        BackgroundRunnerPlugin.registerBackgroundTask()
        BackgroundRunnerPlugin.handleApplicationDidFinishLaunching(launchOptions: launchOptions)
        return true
    }

    func application(_ application: UIApplication, didReceiveRemoteNotification userInfo: [AnyHashable : Any], fetchCompletionHandler completionHandler: @escaping (UIBackgroundFetchResult) -> Void) {
        print("Received remote notification")
        BackgroundRunnerPlugin.dispatchEvent(event: "remoteNotification", eventArgs: userInfo) { result in
            switch result {
            case .success:
                completionHandler(.newData)
            case .failure:
                completionHandler(.failed)
            }
        }
    }
}
Additionally, we need to enable the background capability and different modes that our app will use from the background:
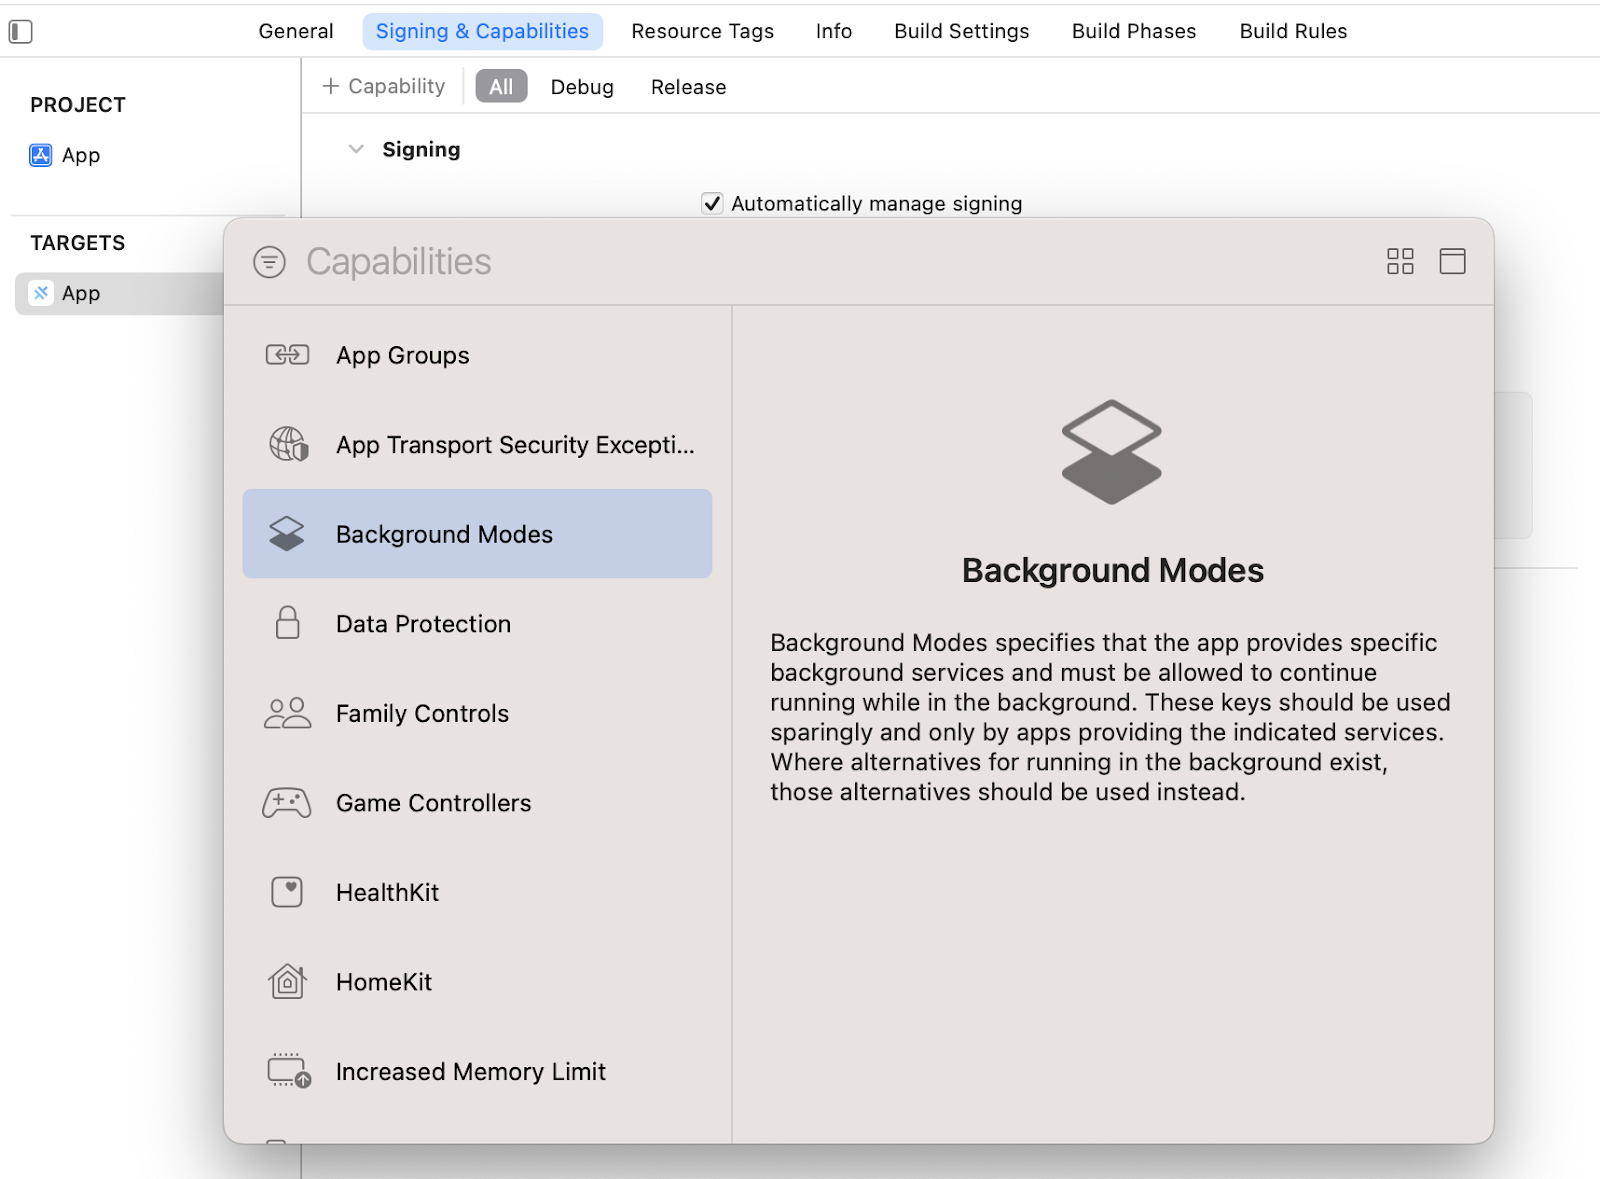
Select the modes as you see fit, but for our example, these are the ones we need:

Now we also need to include some permissions in the ios/App/App/Info.plist for geolocation and also add the BGTaskSchedulerPermittedIdentifiers if it wasn’t added before and use the key of your background task:
<key>BGTaskSchedulerPermittedIdentifiers</key>
<array>
  <string>com.capacitor.background.check</string>
</array>
<key>NSLocationAlwaysAndWhenInUseUsageDescription</key>
<string>$(PRODUCT_NAME) uses location services to track your location.</string>
<key>NSLocationAlwaysUsageDescription</key>
<string>$(PRODUCT_NAME) uses location services to track your location.</string>
<key>NSLocationWhenInUseUsageDescription</key>
<string>$(PRODUCT_NAME) uses location services to track your location.</string>
This did not happen automatically for me, so check your file for that entry.
Android
For Android we first need to add some permissions as well, so open up the android/app/src/main/AndroidManifest.xml and add the following:
<uses-permission android:name="android.permission.ACCESS_COARSE_LOCATION" />
<uses-permission android:name="android.permission.ACCESS_FINE_LOCATION" />
<uses-permission android:name="android.permission.SCHEDULE_EXACT_ALARM" />
<uses-feature android:name="android.hardware.location.gps" />
There are no other changes needed for Android, so we are good to go!
Implementing the Background Task
Let’s start with an easy example and simply save a value to the CapacitorKV store. This is like the Capacitor Preferences plugin and is directly available to our Background Runner. To do so, open up the src/app/runners/runner.js and add the following code:
// Save a value to the Capacitor KV store
addEventListener('testSave', async (resolve, reject, args) => {
  try {
    CapacitorKV.set('foo', 'my bar 42');
    resolve();
  } catch (err) {
    console.error(err);
    reject(err);
  }
});

// Get a value from the Capacitor KV store
addEventListener('testLoad', async (resolve, reject, args) => {
  try {
    const value = CapacitorKV.get('foo');
    resolve(value);
  } catch (err) {
    console.error(err);
    reject(err);
  }
});
This is a very simple example, but it shows how we can use the Capacitor API directly from our background task. Now that we have two events defined, we can call them directly from our app! For this, bring up the src/app/home/home.page.ts and first request permissions for our background runner and then call the dispatchEvent() method to trigger the event:
import { Component } from '@angular/core';
import { BackgroundRunner } from '@capacitor/background-runner';

@Component({
  selector: 'app-home',
  templateUrl: 'home.page.html',
  styleUrls: ['home.page.scss'],
})
export class HomePage {
  user: any = null;

  constructor() {
    this.init();
  } // Request permissions for background tasks

  async init() {
    try {
      const permissions = await BackgroundRunner.requestPermissions({
        apis: ['notifications', 'geolocation'],
      });
      console.log('permissions', permissions);
    } catch (err) {
      console.log(`ERROR: ${err}`);
    }
  } // Test the KV Store

  async testSave() {
    const result = await BackgroundRunner.dispatchEvent({
      label: 'com.capacitor.background.check',
      event: 'testSave',
      details: {},
    });
    console.log('save result', result);
  }

  async testLoad() {
    const result = await BackgroundRunner.dispatchEvent({
      label: 'com.capacitor.background.check',
      event: 'testLoad',
      details: {},
    });
    console.log('load result', result);
  }
}
Now simply call those functions with some buttons and check your logs when you run the app on a real device – you should see the values being saved and loaded!
Using Background Notifications and Data Fetching
The real power of background tasks comes from the fact that we can offload some work from our app, or periodically update some data. Let’s now add a fetch call that returns data, and another call to the CapacitorNotifications plugin to schedule a local notification.
Bring up the src/app/runners/runner.js again and add:
// Make a fetch request to the randomuser API and return first user
addEventListener('fetchTest', async (resolve, reject, args) => {
try {
const res = await fetch('https://randomuser.me/api/');
if (!res.ok) {
throw new Error('Could not fetch user');
}
const result = await res.json();
resolve(result['results'][0]);
} catch (err) {
console.error(err);
reject(err);
}
});
// Trigger a local notification
addEventListener('notificationTest', async (resolve, reject, args) => {
try {
let scheduleDate = new Date();
scheduleDate.setSeconds(scheduleDate.getSeconds() + 5);
CapacitorNotifications.schedule([
{
id: 42,
title: 'Background Magic 🧙♂️',
body: 'This comes from the background runner',
scheduleAt: scheduleDate,
},
]);
resolve();
} catch (err) {
console.error(err);
reject(err);
}
});Again we can simply include those events in our src/app/home/home.page.ts like this:
// Test the background fetch
async performBackgroundFetch() {
  const result = await BackgroundRunner.dispatchEvent({
    label: 'com.capacitor.background.check',
    event: 'fetchTest',
    details: {},
  });
  this.user = result;
};

// Schedule a notification from background
async scheduleNotification() {
  await BackgroundRunner.dispatchEvent({
    label: 'com.capacitor.background.check',
    event: 'notificationTest',
    details: {},
  });
};
And finally, update your UI inside the src/app/home/home.page.html to show the buttons and an item that we try to load from the background:
<ion-header>
  <ion-toolbar>
    <ion-title> Capacitor Background </ion-title>
  </ion-toolbar>
</ion-header>

<ion-content>
  <ion-button (click)="performBackgroundFetch()" expand="full" >Perform Background Call</ion-button>
  <ion-button (click)="scheduleNotification()" expand="full" >Schedule Local Notification</ion-button>
  <ion-button (click)="testSave()" expand="full">Save values</ion-button>
  <ion-button (click)="testLoad()" expand="full">Load values</ion-button>
  <ion-button routerLink="/map" expand="full">Map</ion-button>

  <ion-item *ngIf="user">
    <ion-avatar slot="start">
      <img [src]="user.picture.thumbnail" />
    </ion-avatar>
    <ion-label>
      <h2>{{ user.name.first }} {{user.name.last}}</h2>
      <p>{{ user.email }}</p>
    </ion-label>
  </ion-item>
</ion-content>
Try and trigger the background fetch!

We have now successfully triggered a background task that fetches data and returns it to our app – a huge milestone! You can now also try to schedule a notification and see it appear on your device.

All of this works flawlessly if you have configured everything correctly in the first step. But let’s take this another step further.
Adding Capacitor Google Maps
We could now combine our background check-in with the Capacitor Google Maps Plugin to capture the geolocation, store it and later show it on a map!
To do so, first install the plugin and create a new page:
ionic g page map
npm install @capacitor/google-maps
To configure the plugin you need to supply your Google Maps API key inside the android/app/src/main/AndroidManifest.xml like this:
<application ...>
  <meta-data
    android:name="com.google.android.geo.API_KEY"
    android:value="YOURAPIKEY"/>
</application>
For more information about the integration also check out my Capacitor Maps tutorial on the Ionic Academy! Now we can add two new functions to our runner file to save and load the check-ins:
// Save a time and location object in the Capacitor KV store
addEventListener('checkIn', async (resolve, reject, args) => {
  try {
    console.log('checkIn event fired');
    const { value } = CapacitorKV.get('CHECKINS'); // Gather some data
    const time = new Date().getTime();
    const location = await CapacitorGeolocation.getCurrentPosition(); // Create an array of checkins
    let checkinArr = [{ location, time }]; // Try to append our data to the existing array
    try {
      const parsedArr = JSON.parse(value);
      checkinArr = [...parsedArr, { location, time }];
    } catch (e) {
      console.log('no checkins');
    }

    console.log(checkinArr); // Save the array
    CapacitorKV.set('CHECKINS', JSON.stringify(checkinArr));
    console.log('checkin saved'); // Resolve the event call
    resolve();
  } catch (err) {
    console.error(err);
    reject(err);
  }
});

// Get all checkins from the Capacitor KV store
addEventListener('loadCheckins', (resolve, reject, args) => {
  try {
    const { value } = CapacitorKV.get('CHECKINS');
    try {
      const arr = JSON.parse(value);
      resolve(arr);
    } catch (e) {
      resolve([]);
    }
  } catch (err) {
    console.error(err);
    reject([]);
  }
});
We have previously defined in our Capacitor configuration that the checkIn event will be automatically scheduled when our app goes to the background – if you use different event names, make sure you update your config. To finish the maps implementation, bring up the src/app/map/map.module.ts and include the CUSTOM_ELEMENTS_SCHEMA
import { NgModule } from '@angular/core';
import { CommonModule } from '@angular/common';
import { FormsModule } from '@angular/forms';
import { IonicModule } from '@ionic/angular';
import { MapPageRoutingModule } from './map-routing.module';
import { MapPage } from './map.page';
import { CUSTOM_ELEMENTS_SCHEMA } from '@angular/core';

@NgModule({
  imports: [CommonModule, FormsModule, IonicModule, MapPageRoutingModule],
  declarations: [MapPage],
  schemas: [CUSTOM_ELEMENTS_SCHEMA],
})
export class MapPageModule {}
Finally, sprinkle in some CSS inside the src/app/map/map.page.scss to make the map view visible on native devices:
capacitor-google-map {
    display: inline-block;
    width: 100%;
    height: 400px;
}

ion-content {
    --background: none;
}
Now we can use the map in our page and also display a list with the check-ins below it, so change your src/app/map/map.page.html to:
<ion-header>
  <ion-toolbar>
    <ion-buttons slot="start">
      <ion-back-button defaultHref="home"></ion-back-button>
    </ion-buttons>
    <ion-title>Map</ion-title>
  </ion-toolbar>
</ion-header>

<ion-content>
  <ion-button (click)="loadCheckins()" expand="full">Load Checkins</ion-button>
  <capacitor-google-map #map></capacitor-google-map>
  <ion-list>
    <ion-item *ngFor="let checkin of checkins">
      <ion-label>
        <h2>{{ checkin.location?.longitude }} - {{ checkin.location?.latitude }}</h2>
        <p>{{ checkin.time | date:'medium' }}</p>
      </ion-label>
    </ion-item>
  </ion-list>
</ion-content>
Finally in the src/app/map/map.page.ts we need to initialize the map and then load the check-ins from the background runner using dispatchEvent() again.
When we have the data, we can add markers to the map and display them:
import { AfterViewInit, Component, ElementRef, ViewChild } from '@angular/core';
import { BackgroundRunner } from '@capacitor/background-runner';
import { GoogleMap, Marker } from '@capacitor/google-maps';

@Component({
  selector: 'app-map',
  templateUrl: './map.page.html',
  styleUrls: ['./map.page.scss'],
})
export class MapPage implements AfterViewInit {
  @ViewChild('map') mapRef!: ElementRef<HTMLElement>;
  map!: GoogleMap;
  checkins: any[] = [];

  constructor() {}
  ngAfterViewInit() {
    this.createMap();
  }

  async createMap() {
    this.map = await GoogleMap.create({
      id: 'my-cool-map',
      element: this.mapRef.nativeElement,
      apiKey: 'YOURAPIKEY',
      config: {
        center: {
          lat: 51.88,
          lng: 7.6,
        },
        zoom: 8,
      },
    });
  }

  loadCheckins = async () => {
    const result = (await BackgroundRunner.dispatchEvent({
      label: 'com.capacitor.background.check',
      event: 'loadCheckins',
      details: {},
    })) as any;

    if (result) {
      this.checkins = [];
      Object.keys(result).forEach((key) => {
        this.checkins.push(result[key]);
      });
      this.addMarkers();
    }
  };

  async addMarkers() {
    if (this.checkins.length === 0) {
      return;
    }

    const markers: Marker[] = this.checkins.map((item) => {
      return {
        coordinate: {
          lat: item.location.latitude,
          lng: item.location.longitude,
        },
        title: item.time,
      };
    });
    await this.map.addMarkers(markers);
  }
}
Once your background task has run, you should see the markers on the map!
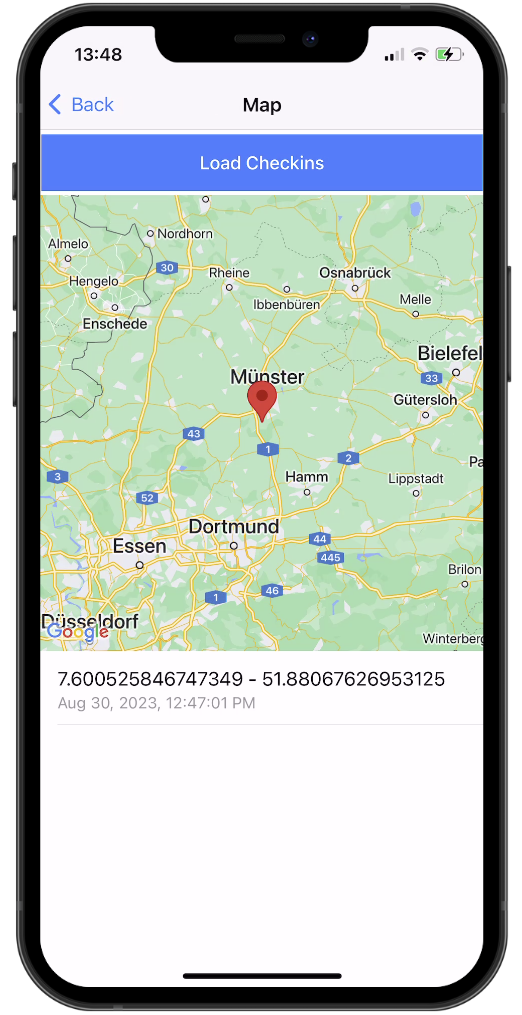
But what if it’s not running and you don’t want to wait until it’s executed?
Debug and Trigger Background Tasks
For iOS, there is a handy trick to manually trigger your background tasks.
First, we will add a random print statement to the BackgroundRunner file in our pods target after the BGTaskScheduler.shared.submit() call.

Set a breakpoint to the left of that line of code, run your app, and slide it to the background – your breakpoint will be triggered.
Now you can run the following command in the log window where you see (lldb):
e -l objc -- (void)[[BGTaskScheduler sharedScheduler] _simulateLaunchForTaskWithIdentifier:@"com.academy.runner.check"]Replace the identifier with your own and hit enter.
This causes iOS to schedule and run your background task when the app continues, so let the app continue and you should see a log from your runner.
If you bring up the app again, you should also see the check-ins on the map!
Apparently, the only debugging option for Android I found was to use the App Inspector view in Android Studio, from which you can at least get a glimpse of your background job:

If you find a way to directly trigger the Android background task, let me know!
Recap
In this tutorial we have learned how to use the new Capacitor Background Runner plugin to perform tasks in the background, like fetching data, sending notifications, or even getting the user’s geolocation.
We have access to a limited set of APIs already, but we need to make sure we request the permissions upfront and configure our native apps correctly. To see all of them in action, also check out the official Capacitor Background Runner demo app!
Keep in mind the limitations of background tasks which are quite heavily restricted on both iOS and Android. But if you act within the boundaries of the operating systems, adding background tasks to your Ionic app with Capacitor is now possible and right at your fingertips!


