Creating Your Own Media Plugin For Capacitor: An iOS Tutorial
If you read my recent blog post on Progressive Web Apps, I covered how performant Ionic and Capacitor can be when creating media-heavy projects like video streaming apps. By utilizing libraries like hls.js in our PWAs, it empowers us to effortlessly create media-rich apps. However, while using libraries like hls.js are great for PWAs, you might have noticed something if you tried to make that demo app cross-platform: hls.js doesn’t work on mobile.
While this may seem like an insurmountable challenge, you are able to get video streaming working in a cross-platform Capacitor application by building a custom Capacitor plugin. In this tutorial, I’ll walk you through how to create your own Capacitor plugin for iOS that interfaces with UIKit, AVKit, and AVFoundation to demonstrate how to get streaming videos playing in your own applications.
Before We Begin
This tutorial was heavily inspired by Simon Grimm’s video on creating Capacitor plugins and the Ionic Capacitor plugin documentation. My goal for this tutorial is to be an extension of those by making a few updates to address Capacitor plugin changes and demonstrate how to utilize video libraries that aren’t normally shown. I plan on creating a few blog posts around this topic to show how this Capacitor plugin will work for web and Android as well. Be sure to check back as I will be updating all the related blog posts as I build the plugin. In the meantime, you will be able to find the completed plugin project here and the test application here so feel free to check it out or follow along.
The Media Streaming Problem
Let’s discuss why hls.js doesn’t work on mobile beyond the fact that it’s a JavaScript library: Every platform handles media differently, and major tech companies are fighting for control in the streaming space. Different steps are required to get the streaming videos working depending on the streaming protocol that you are using.
In this tutorial, the video format I’m using is HLS, a protocol developed by Apple. It’s widely supported and can be used on web, iOS, and Android, but the implementation requires us to implement it at the device level or use libraries to get it to work. Lucky for us, HLS is natively supported by Apple in iOS, so it’s simple to implement.
Building The Plugin
The first step is to initialize the Capacitor Plugin builder in your terminal and go through the prompts. If you plan on publishing your plugin, be sure to make these values unique:
npm init @capacitor/plugin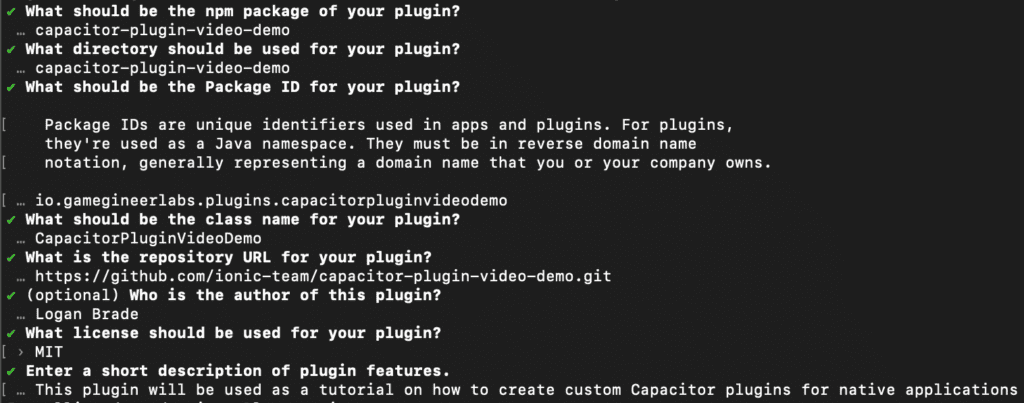
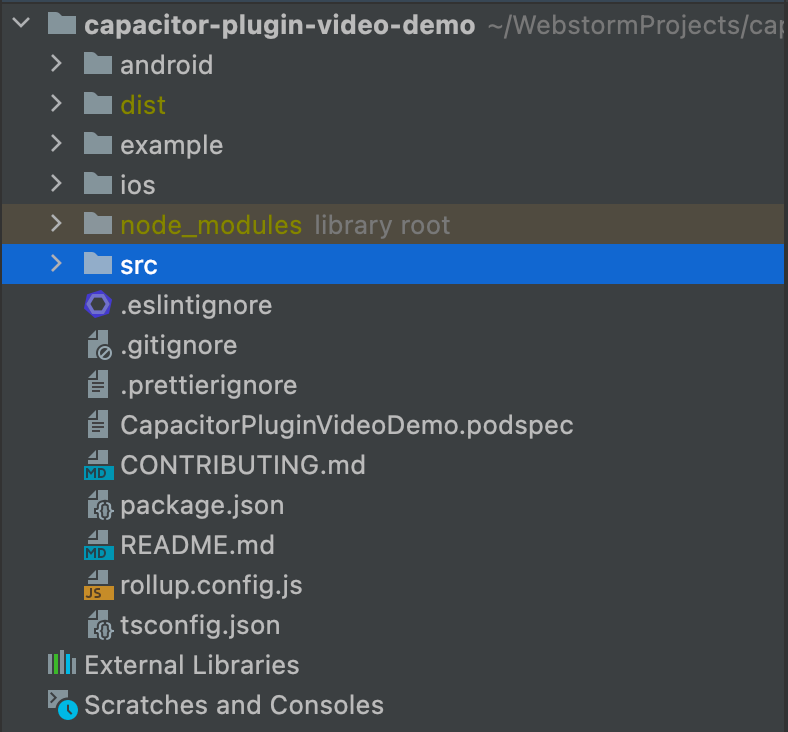
Once the CLI has built your Capacitor plugin project, navigate to your project’s directory and run the build:
cd capacitor-plugin-video-demo
npm run build
With the project built, you should see the following project structure:
Navigate to src/definitions.ts and copy/paste the following line of code as this will allow us to call the playVideo method in our project:
playVideo(video: string): Promise<void>;The full definitions.ts file should look like this:
export interface CapacitorPluginVideoDemoPlugin {
  echo(options: { value: string }): Promise<{ value: string }>;
  playVideo(video: string): Promise<void>;
}
Next go to src/web.ts and add the following (I believe this just pertains to the web implementation, but I will be adding it since we’re here):
async playVideo(video: string): Promise<void> {
    console.log('ECHO', video);
}
web.ts should look like this:
import { WebPlugin } from '@capacitor/core';
import type { CapacitorPluginVideoDemoPlugin } from './definitions';

export class CapacitorPluginVideoDemoWeb
  extends WebPlugin
  implements CapacitorPluginVideoDemoPlugin
{

  async playVideo(video: string): Promise<void> {
    console.log('ECHO', video);
  }

}
Our plugin is done for now, so let’s build the project (*Note: The approach we’re taking is locally creating and editing a plugin, but you could publish this to NPM then install it in your test project):
npm run buildCreating A Test App
With our plugin built or published to NPM, we now need a project to test it in, so let’s create a new Ionic Angular project:
ionic start videoPluginTest blank --type=angular --capacitorOpen videoPluginTest in your IDE and install your custom Capacitor plugin:
npm install ../capacitor-plugin-video-demoAfter the plugin is installed, you should be able to see it in your package.json file:

With everything installed properly, we now need a way to get the video to play, so we’re just going to implement a simple play button:
<ion-header [translucent]="true">
  <ion-toolbar>
    <ion-title>
      Video Test
    </ion-title>
  </ion-toolbar>
</ion-header>

<ion-content [fullscreen]="true">
  <ion-button expand="full" (click)="playVideo('https://hlsdemooutput.s3.us-west-2.amazonaws.com/Ionic+in+30+Series_+Ionic+Angular.m3u8')">
    Play Video
  </ion-button>
</ion-content>
Go to our home.page.ts, import the plugin, and add the playVideo method:
import { Component } from '@angular/core';
import { IonicModule } from '@ionic/angular';
import {CapacitorPluginVideoDemo} from "../../../../capacitor-plugin-video-demo";

@Component({
  selector: 'app-home',
  templateUrl: 'home.page.html',
  styleUrls: ['home.page.scss'],
  standalone: true,
  imports: [IonicModule],
})

export class HomePage {
  video = <any>[];
  constructor() {}

  async playVideo(video: string) {
    await CapacitorPluginVideoDemo.playVideo(video)
  }

}
Now that we have that, we’ll need to build the test application, install the Capacitor/iOS package, sync with iOS, and then open our project in XCode:
npm run build
npm install @capacitor/ios
npx cap add ios
npx cap sync ios
npx cap open ios
Adding Video To The Plugin
In XCode we’ll update our Capacitor plugin by navigating to Pods/Development Pods/CapacitorPluginVideoDemoPlugin.swift and replace it with the code below (You can do this in your web IDE, but I find it easier in XCode with Swift code completion):
import Foundation
import Capacitor
import UIKit
import AVKit

/**
 * Please read the Capacitor iOS Plugin Development Guide
 * here: https://capacitorjs.com/docs/plugins/ios
 */

@objc(CapacitorPluginVideoDemoPlugin)
public class CapacitorPluginVideoDemoPlugin: CAPPlugin {
    private let implementation = CapacitorPluginVideoDemo()

    @objc func echo(_ call: CAPPluginCall) {
        let value = call.getString("value") ?? ""
        call.resolve([
            "value": implementation.echo(value)
        ])
    }

    @objc func playVideo(_ call: CAPPluginCall) {
        guard let url = URL(string: "https://hlsdemooutput.s3.us-west-2.amazonaws.com/Ionic+in+30+Series_+Ionic+Angular.m3u8") else { return }
        let player = AVPlayer(url: url)

        DispatchQueue.main.sync {
            // Create a new AVPlayerViewController and pass it a reference to the player.
            let controller = AVPlayerViewController()
                controller.player = player

            // Modally present the player and call the player's play() method when complete.
            self.bridge?.viewController?.present(controller, animated: true) {
                    player.play()
            }
        }
    }
}
To help understand what’s happening, this is the playVideo logic and more information about native views in Capacitor can be found here:
@objc func playVideo(_ call: CAPPluginCall) {

//This is our video URL that we're converting from a string to a URL
        guard let url = URL(string: "https://hlsdemooutput.s3.us-west-2.amazonaws.com/Ionic+in+30+Series_+Ionic+Angular.m3u8") else { return }

//This instantiates our player
        let player = AVPlayer(url: url)

//This is a weird iOS quirk where only the main thread can update the view
        DispatchQueue.main.sync {

            // Create a new AVPlayerViewController and pass it a reference to the player.
            let controller = AVPlayerViewController()

                controller.player = player

            // Modally present the player and call the player's play() method when complete.
            //This lets us communicate with Capacitor to let us show a native view
            self.bridge?.viewController?.present(controller, animated: true) {

                    //If it works, play the video
                    player.play()
            }
        }
    }
Then navigate to the CapacitorPluginVideoDemoPlugin.m and update the code to include the playVideo method to bind our Capacitor project with our plugin:
#import <Foundation/Foundation.h>
#import <Capacitor/Capacitor.h>

// Define the plugin using the CAP_PLUGIN Macro, and
// each method the plugin supports using the CAP_PLUGIN_METHOD macro.

CAP_PLUGIN(CapacitorPluginVideoDemoPlugin, "CapacitorPluginVideoDemo",
           CAP_PLUGIN_METHOD(echo, CAPPluginReturnPromise);
           CAP_PLUGIN_METHOD(playVideo, CAPPluginReturnPromise);

)
Finally, we need to update the AppDelegate file to configure the audio of our video application with the following code:
import UIKit
import Capacitor
import AVFoundation

@UIApplicationMain
class AppDelegate: UIResponder, UIApplicationDelegate {

    var window: UIWindow?

    func application(_ application: UIApplication, didFinishLaunchingWithOptions launchOptions: [UIApplication.LaunchOptionsKey: Any]?) -> Bool {

        // Override point for customization after application launch.
        let audioSession = AVAudioSession.sharedInstance()

            do {
                try audioSession.setCategory(.playback, mode: .moviePlayback)
            }
            catch {
                print("Setting category to AVAudioSessionCategoryPlayback failed.")
            }
            return true
    }

    func applicationWillResignActive(_ application: UIApplication) {

        // Sent when the application is about to move from active to inactive state. This can occur for certain types of temporary interruptions (such as an incoming phone call or SMS message) or when the user quits the application and it begins the transition to the background state.

        // Use this method to pause ongoing tasks, disable timers, and invalidate graphics rendering callbacks. Games should use this method to pause the game.

    }

    func applicationDidEnterBackground(_ application: UIApplication) {

        // Use this method to release shared resources, save user data, invalidate timers, and store enough application state information to restore your application to its current state in case it is terminated later.

        // If your application supports background execution, this method is called instead of applicationWillTerminate: when the user quits.

    }

    func applicationWillEnterForeground(_ application: UIApplication) {

        // Called as part of the transition from the background to the active state; here you can undo many of the changes made on entering the background.

    }

    func applicationDidBecomeActive(_ application: UIApplication) {

        // Restart any tasks that were paused (or not yet started) while the application was inactive. If the application was previously in the background, optionally refresh the user interface.

    }

    func applicationWillTerminate(_ application: UIApplication) {

        // Called when the application is about to terminate. Save data if appropriate. See also applicationDidEnterBackground:.

    }

    func application(_ app: UIApplication, open url: URL, options: [UIApplication.OpenURLOptionsKey: Any] = [:]) -> Bool {

        // Called when the app was launched with a url. Feel free to add additional processing here,

        // but if you want the App API to support tracking app url opens, make sure to keep this call

        return ApplicationDelegateProxy.shared.application(app, open: url, options: options)

    }

    func application(_ application: UIApplication, continue userActivity: NSUserActivity, restorationHandler: @escaping ([UIUserActivityRestoring]?) -> Void) -> Bool {

        // Called when the app was launched with an activity, including Universal Links.

        // Feel free to add additional processing here, but if you want the App API to support

        // tracking app url opens, make sure to keep this call

        return ApplicationDelegateProxy.shared.application(application, continue: userActivity, restorationHandler: restorationHandler)

    }

}
With that completed, you now should be able to test your Capacitor plugin for iOS! As of this writing, you will not be able to use the built-in XCode simulator due to a bug with AVKit. However, you should be able to plug in your iPhone and launch the application directly on your phone with the following result:
Conclusion
By creating your own custom Capacitor plugins, you can unlock more native experiences and up-level your cross-platform applications. In this example, we were able to interface with AVKit to create a basic video streaming application that will allow you to watch streaming videos in iOS and utilize features like AirPlay in your apps with only a few lines of code. If you are looking to extend the functionality of this player or want to try working with other libraries, definitely check out Apple’s Developer page to learn more about what you can interface with, and be sure to follow the Ionic Blog for more content like this!
If you have any questions about this project, feel free to contact us in the forum or the official Discord page, and we’ll do our best to help!