One MEAN Ionic 2 Todo App on Heroku, Part 2
In part 1 of this series, we started building an end-to-end Ionic 2 app with a Node.js backend. If you’re just joining us now, you’ll probably want to stop and go back to the first post.
Up to this point, we’ve worked primarily in the server.js file where we created an Express app and defined the api endpoints for the todos stored in a MongoDB database, provisioned by mLab via Heroku.
In this next post, we’ll write Angular 2 code using TypeScript to create the frame for our Ionic 2 todo app, communicate with our backend and display the todo that we added to the database.
Sound good? Great, let’s get going.
Display all of the todos
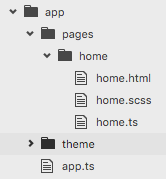
Now that our backend server and database are super-hardcore, we can start building out the frontend todo app. Out of the box, when the Ionic CLI created our project, the app folder looks like this:
From here, let’s start adding the pieces to display our todos.
The Todo Object
All of the todo data that will be sent from our API will be in a JSON format that we stealthily defined in the last post when we added a todo. If we specify what that data will look like as an object, we’ll be able to take advantage of strong typing (type checking) in TypeScript to ensure each Todo has the correct properties. In order to do this, create a file in your app/ folder called todo.ts and put the following code:
  //todo.ts
  export class Todo {
    _id: number;
    description: string;
    isComplete: boolean;
  }
We’ll use this object in other files shortly.
The TodoService
In our Angular 2 app, we want to abstract HTTP services away from our view logic. In Angular we do this by creating a service, also known as a provider. We can use the Ionic CLI to generate a new provider:
$/todo-ionic2-heroku > ionic g provider TodoService
The ionic g command just created /app/providers/todo-service/todo-service.ts for us. If you go into this new file, you’ll see it generated a load() { … } function for us. Let’s update this file to get our todos:
  //todo-service.ts
  import {Injectable} from '@angular/core';
  import {Http, Headers} from '@angular/http';
  import {Observable} from 'rxjs/Observable';
  import 'rxjs/Rx';
  import {Todo} from '../../todo.ts';

  @Injectable()
  export class TodoService {
    todosUrl = "/api/todos"

    constructor(public http: Http) {}

    // Get all todos
    load(): Observable<Todo[]> {
      return this.http.get(this.todosUrl)
                 .map(res => res.json())
                 .catch(this.handleError);
    }

    handleError(error) {
      console.error(error);
      return Observable.throw(error.json().error || 'Server error');
    }
  }
Our load function uses the HTTP module from Angular 2, made available as a class variable in our TodoService’s constructor. For http.get, we’ll get an Observable back with JSON data. We’ll subscribe to that data in our Component class in the next section.
Note that we updated our import statements to include Observables, which we’ll use instead of built-in ES6 Promises. Just know that you could have just as easily worked with Promises instead. We also included the Todo class to allow for type checking and HTTP headers which we’ll use in our other HTTP methods that we’ll add in the next post.
For now, let’s go ahead and update our app/pages/home/home.ts file to load() the Todo list using our awesome TodoService class.
The HomePage Component
Head into your home.ts file found in /app/pages/home/ and start by importing the TodoService:
import {TodoService} from '../../providers/todo-service/todo-service';
Then we update our @Component decorator with metadata specifying our TodoService as a provider:
  @Component({
    templateUrl: 'build/pages/home/home.html',
    providers: [TodoService]
  })
Now, we can update our empty constructor, create a todos property, import the TodoService, and assign it to a property of the class.
  public todos: Todo[];

  constructor(public todoService: TodoService) {
    this.loadTodos();
  }
With our TodoService ready to roll, let’s add a loadTodos method to use our TodoService where we’ll subscribe to the Observable<Todo[]> returned by our HTTP request and extract our todos into our class’ todos parameter:
  loadTodos() {
    this.todoService.load()
        .subscribe(data => {
          this.todos = data;
        })
  }
If you don’t subscribe to the Observable returned by the methods in our `TodoService, that “observable is cold. This means the request won’t go out until something subscribes to the Observable” (Angular 2 Docs).
Put this all together and we have the home.ts file below (which also includes an additional import statement to include the Item Sliding component).
  //home.ts
  import {Component} from "@angular/core";
  import {ItemSliding, Item} from 'ionic-angular';
  import {TodoService} from '../../providers/todo-service/todo-service';
  import {Todo} from '../../todo.ts';

  @Component({
    templateUrl: 'build/pages/home/home.html',
    providers: [TodoService]
  })
  export class HomePage {
  public todos: Todo[];

  constructor(public todoService: TodoService) {
    this.loadTodos();
  }

  loadTodos() {
    this.todoService.load()
        .subscribe(data => {
          this.todos = data;
        })
    }
  }
The HomePage Component’s Template
The final step is to update the home.html template to display the todos we stored in our todos array.
To do this let’s add the following markup:
<!-- home.html -->
  <ion-navbar primary *navbar>
    <ion-title>
      MEAN Ionic 2 Todo App
    </ion-title>
  </ion-navbar>
  <ion-content class="home" padding>
    <h2>Add a Todo</h2>
    <ion-item no-lines>
      <ion-input #newTodo (keyup.enter)="return;" type="text" placeholder="Add new todo..." ></ion-input>
      <button clear large item-right (click)="return;">
        <ion-icon name="add"> </ion-icon>
      </button>
    </ion-item>
    <h2>Todo List <small>Swipe a todo to edit or delete</small></h2>
    <ion-list no-lines>
      <ion-item-sliding #slidingItem *ngFor="let todo of todos">
        <ion-item>
          <ion-checkbox (click)="return;" [checked]="todo.isComplete"></ion-checkbox>
          <ion-item text-wrap item-left [class.completed]="todo.isComplete">
            {{ todo.description }}
          </ion-item>
        </ion-item>
        <ion-item-options (ionSwipe)="">
          <button (click)="return;">Edit</button>
          <button danger (click)="return;">
            <ion-icon name="trash"></ion-icon>
          </button>
        </ion-item-options>
      </ion-item-sliding>
    </ion-list>
  </ion-content>
While we’ve added quite a bit into this file, the most important piece to notice is the *ngFor directive we have on the ionic-item-sliding component.
*ngFor="let todo of todos"
Here we are defining a loop variable with let todo that will receive a Todo from our todos array defined in our Home Component class. Within this newly instantiated template for each Todo, we’ll access and alter the properties of each todo.
Right off the bat, you can see us using todo.description to render {{ }} our Todo’s description, and todo.isComplete on several binding properties [ ] to either add a class or check a checkbox. Finally, you will also notice several spots where we’re handling events such as (click) and (keyup.enter), but instead of making actual function calls, we will just return; for each event. We’ll get those working in the next post.
Styles to Make Things Purdy
Although the utilitarian among us may be shaking their heads, let’s go ahead and add styles for our app to the app/theme/app.core.scss file. Below the import statement, add the following:
  // app.core.scss
  h2 {
    color: color($colors, dark);
    font-size: 1.7rem;
    margin:10px 0 0;
    small {
      color: lighten(color($colors, dark), 20%);
      font-weight: normal;
    }
  }

  ion-list {
    >ion-item-sliding {
      border-bottom: 1px solid color($colors, light);

      .item,
      &:last-child .item {
        border:none;
        margin:0;
      }

      .completed {
          text-decoration: line-through;
          font-style: italic;
      }
    }
  }

  ion-textarea{
    .text-input {
      font-size: 1.6rem;
      color: color($colors, dark);
      margin:0;
      padding:8px;
      border:1px solid color($colors, light);
      border-radius:3px;
    }
  }
You might notice some unused things in there — don’t worry, we’ll be adding more markup to our app in next post.
Serve it Up
If you’d like to see what things look like thus far, head over to your terminal and open up two tabs, one to run the ionic build server and one to run our backend server.
  $/todo-ionic2-heroku > ionic serve
  $/todo-ionic2-heroku > node server.js
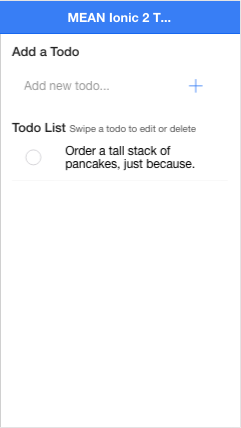
Ionic will open up port 8100 for the build server, but if we want to see our Todos, open localhost:8080. Assuming you’re also using a device viewer in your browser of choice, you should hopefully see something like this:


So awesome, right!? I just called my Grandma to tell her we just displayed real data using Ionic 2/Angular 2. She’s so proud!
Concluding Thoughts
Literally nothing can stop you now. You’re becoming a Pokémon Master… I mean an Ionic 2 Wizard! In this post we wrote an HTTP service to collect todos from our MongoDB database, set up our view logic to utilize that service, and designed the front end of our simple app. We also learned a bit about Observables and did some type-checking with TypeScript.
In the next and final post, we’ll flesh out the details to allow us to fully interact with our Ionic 2 app. Specifically, we’ll flesh out the TodoService to POST (add), PUT (update) and DELETE (..um, well, delete) Todos. Then we’ll link this up to the app’s view. We’ll also add another page to our app to isolate and edit todos.