Build and Deploy Mobile Apps with Nuxt Ionic
The Nuxt Ionic Module lets you combine the power of Nuxt and Ionic to quickly build performant cross-platform apps. Whether you are new to Nuxt or Ionic (or familiar with both), the module provides an out-of-the-box solution to code your app once and deploy to iOS, Android, and web.
Nuxt.js is a powerful meta-framework for building applications with Vue.js. The Ionic framework provides a comprehensive set of UI components and tools that make it easy to build and deploy high-quality mobile apps. The Nuxt Ionic Module works alongside Capacitor to provide native APIs and plugins, as well as build to native iOS and Android from your web app codebase.
There are several benefits to using Nuxt and Ionic together. Nuxt offers a simple and easy-to-use structure with file-system routing, auto-imported components, and more. Ionic provides a native look-and-feel, adaptive styling for iOS and Android platforms, and built-in gestures and animations. Both provide an intuitive developer experience, and the ability to use a single codebase for multiple platforms can save time and resources during development.
In this blog post, we’ll explore the features of the Nuxt Ionic Module and learn how to get started with building your own Nuxt Ionic mobile app.
The Nuxt Ionic Module
Nuxt applications are extendable using modules. There are 160+ modules in the Nuxt ecosystem, including popular ones for content, images, and state management. Nuxt Ionic is a module, and can be added to an existing Nuxt application.
The Nuxt Ionic Module provides some key features:
- No/low configuration required
- Auto-import of Ionic components and icons
- Out-of-the-box page routing and access to both Nuxt and Ionic routing utilities
- Theming support
- Built-in Ionic utilities for gestures and animation
- Capacitor support for native APIs and builds
Getting Started
The source code to accompany this blog post can be found on GitHub here. Feel free to fork the repo or follow along below to build from scratch.
We’ll start with a Nuxt 3 starter app. In your terminal, run the following:
npx nuxi init nuxt-ionic-appOnce the app is generated, open in your code editor to start building with Nuxt Ionic.
Installing the Ionic Module
Install the Nuxt Ionic Module with the following command:
npm install @nuxtjs/ionic -DThen, update the nuxt.config.ts file in the root of your project to add ”@nuxtjs/ionic” to your modules array. This is how you configure any Nuxt module added to your project.
export default defineNuxtConfig({
  modules: ["@nuxtjs/ionic"],
});
Add Page Routing
Nuxt provides a file-based routing system. This means that any files within a pages directory will automatically be generated as routes in our application. When using Nuxt Ionic, we combine the file-based routing with the Ionic Router for a mobile-like navigation experience with animations.
First, change the app.vue file to the following:
<template>
  <ion-app>
    <ion-router-outlet />
  </ion-app>
</template>
This wraps our app in the root <ion-app> component and the <ion-router-outlet>.
Then, create a pages directory in the root of the project and add an index.vue and resources.vue file within the directory. An index.vue file is required for file-based routing unless you override the default. Now we have two pages for our app with built-in routing.
Add Ionic Components and Icons
Ionic components and icons are automatically imported to all our components. This makes it easy for us to create a mobile UI for the app. You can see the documentation here for all the available components.
Update the index.vue file to create the landing page of our app, matching the code found here. Snippet below:
<template>
  <ion-page>
    <ion-header :translucent="true">
      <ion-toolbar>
        <ion-title>Nuxt Ionic</ion-title>
      </ion-toolbar>
    </ion-header>
    <ion-content :fullscreen="true">
      <ion-header collapse="condense">
        <ion-toolbar>
          <ion-title size="large">Nuxt Ionic</ion-title>
        </ion-toolbar>
      </ion-header>
      <div id="container">
        <h1>Nuxt Ionic Module</h1>
        <ion-button router-link="/resources">Get Started</ion-button>
      </div>
    </ion-content>
  </ion-page>
</template>
...
You’ll notice there is no <script> tag needed — we can use any Ionic component without importing. This page has the standard structure for an Ionic app, with <ion-page> at the root, then <ion-header> and <ion-content> at the same level inside. Make sure to use router-link="" for navigation to leverage Ionic’s built-in navigation animations.
Next, update the resources.vue file to create a list of links using the <ion-list> component, matching the source code here. Snippet below:
...
<ion-list :inset="true">
  <ion-item>
    <ion-icon :icon="ioniconsBookOutline" slot="start"></ion-icon>
    <ion-label>
      <a target="_blank" rel="noopener noreferrer"      href="https://ionic.nuxtjs.org/">Nuxt Ionic Documentation</a>
    </ion-label>
  </ion-item>
...
Here we are using <ion-icon> with auto-import, so we have access to 1,300 icons with no configuration needed. Check out the documentation here for a complete list of available icons.
Note that the anchor <a> tag with href is used for external links while router-link is used for navigation.
After these updates, run npx nuxi dev to build the app locally in the browser and navigate between pages.
Add Theme
To add themes, such as a dark theme, create a .css file that overrides the default Ionic theme variables. In this example, we’ll create a themes directory and a `variables.css` file within. Then, update the `variables.css` file to match the source code here, which comes from the Ionic starter app.
Snippet:
...
  /*
   * iOS Dark Theme
   * -------------------------------------------
   */
  .ios body {
    --ion-background-color: #000000;
    --ion-background-color-rgb: 0, 0, 0;
    --ion-text-color: #ffffff;
    --ion-text-color-rgb: 255, 255, 255;
    --ion-color-step-50: #0d0d0d;
    --ion-color-step-100: #1a1a1a;
    --ion-color-step-150: #262626;
    --ion-color-step-200: #333333;
    --ion-color-step-250: #404040;
    --ion-color-step-300: #4d4d4d;
    --ion-color-step-350: #595959;
    --ion-color-step-400: #666666;
    --ion-color-step-450: #737373;
    --ion-color-step-500: #808080;
    --ion-color-step-550: #8c8c8c;
    --ion-color-step-600: #999999;
    --ion-color-step-650: #a6a6a6;
    --ion-color-step-700: #b3b3b3;
    --ion-color-step-750: #bfbfbf;
    --ion-color-step-800: #cccccc;
    --ion-color-step-850: #d9d9d9;
    --ion-color-step-900: #e6e6e6;
    --ion-color-step-950: #f2f2f2;
    --ion-item-background: #000000;
    --ion-card-background: #1c1c1d;
  }
  .ios ion-modal {
    --ion-background-color: var(--ion-color-step-100);
    --ion-toolbar-background: var(--ion-color-step-150);
    --ion-toolbar-border-color: var(--ion-color-step-250);
  }
...
Wherever you create the .css file, you’ll need to add it to your nuxt.config.ts file in the css array.
export default defineNuxtConfig({
  modules: ["@nuxtjs/ionic"],
  css: ["@/theme/variables.css"],
});
Ionic has built-in CSS variables that can be customized to create a theme. Learn more about theming with Ionic here.
Once updated, restart the app and update the browser or system theme to see the app change from light to dark mode.
Native Builds with Capacitor
Now that our app is developed, it’s time to build for iOS and Android devices using Capacitor. Built by Ionic, Capacitor provides a native runtime and native APIs for accessing device functionality like camera or location.
Capacitor is installed by default with Nuxt Ionic Module, but must be configured. Using the Ionic CLI is recommended. It can be installed globally with npm install -g @ionic/cli or yarn global add @ionic/cli or is available via npx.
First enable Capacitor, then add the Android and/or iOS platform(s) you wish to use for your app.
npx @ionic/cli integrations enable capacitor # or ionic integrations enable capacitor

npx @ionic/cli capacitor add ios # or ionic capacitor add ios

npx @ionic/cli capacitor add android # or ionic capacitor add android
There are system requirements for building and running iOS and Android apps locally. See the Capacitor environment setup documentation here for more details.
Once your environment is set up and Capacitor enabled, you can build, sync, and run your app with the following steps:
- Create a web build with
npx nuxi generateornpx nuxi build. - Run
npx cap syncto update your Capacitor project directories with your latest app build. - Run
npx cap run androidornpx cap run iosto run the app from the command line using an installed device OR - (Optional) Run
npx cap open androidornpx cap open iosto open the project in Android Studio or XCode, respectively.
Now you can see your app run on an emulated iOS or Android device!
Deploying with Appflow
Your app is now running locally, but how do you get it in the hands of users? Appflow, the mobile DevOps solution from Ionic, lets you create web and native builds in the cloud and deploy to Google Play and Apple App Store. You can even push live updates to apps built with Ionic or Capacitor.
For this post, we’ll walk through connecting your app and creating an Android debug build.
Start by creating a repository in the Git provider of your choice (we’ll use GitHub) and pushing your local project to the remote repository.
Log in or create an account at ionic.io to get started with Appflow. Then, use the instructions here to import an existing app and select the repository for your Nuxt project.
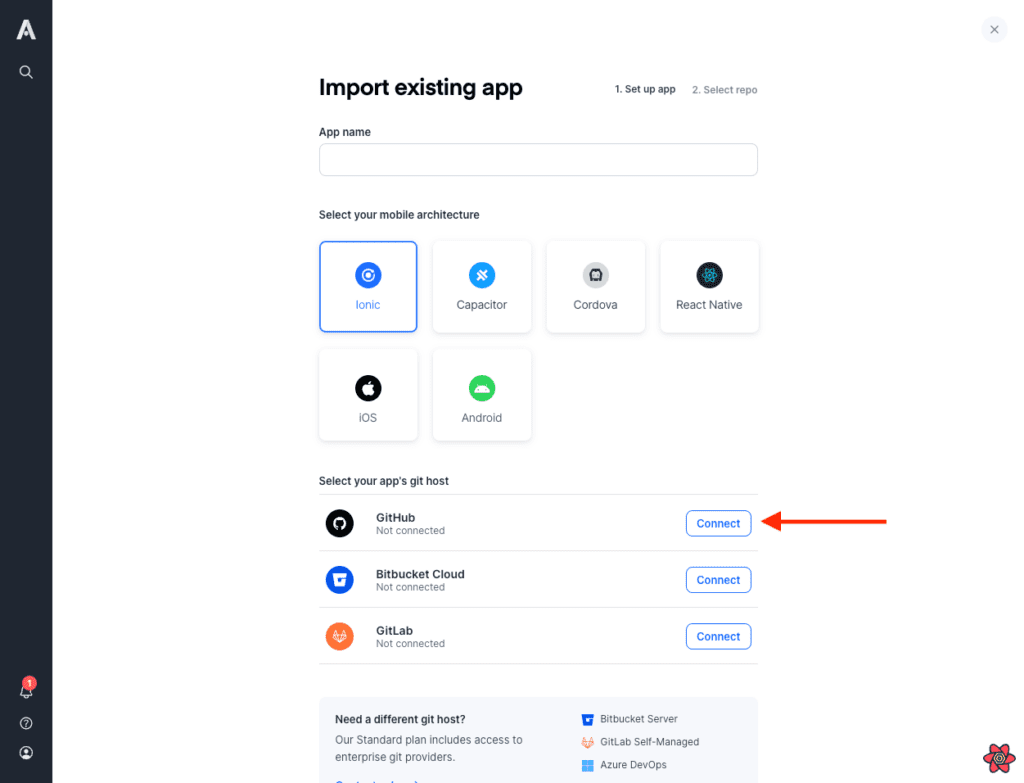
Once connected, you’ll see the most recent commit in the Commits screen in Appflow. Select ‘Start build’ from the latest commit.
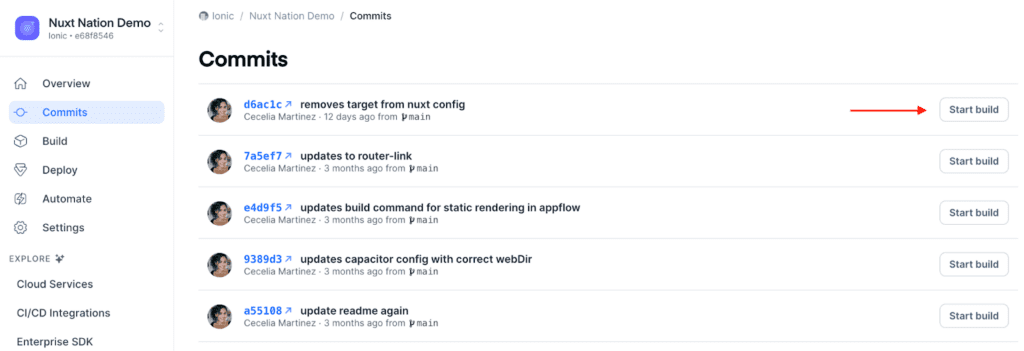
This brings you to the build screen. Select the Android platform, and the default latest Build stack and Debug build type will pre-select. For this build type, no signing certificates, custom environments, or native configs are needed. Just click build!

This kicks off the process for a cloud native build of the app for Android devices. Once the build is complete, you can download the .apk and .aab files to run in an emulator or on a device.

When your app is ready for a production build, you can store signing certificates, provisioning profiles, and app store credentials in Appflow to easily build and deploy for end users.
You can get started with cloud native builds in Appflow by starting a free trial today.
Learn More
You now have everything you need to get started with building and deploying Nuxt Ionic apps. To learn more, check out the Nuxt Ionic documentation and the GitHub repository for the module.
Make sure to share your own Nuxt Ionic app with the Ionic community in our Discord or Forum!